By Mira Chen — A well-designed home is one of the most satisfying long-term projects in Heartopia, but the furniture system is far deeper than the tutorial suggests. Over 300 furniture pieces wait to be earned through shops, events, the D.G. rewards, blueprints, and crafting. This guide explains how house expansion works, where every furniture type comes from, the materials needed to craft premium pieces, and the fastest route to a high Home Assessment score. All data is verified from the official Heartopia community wiki (heartopia.app) as of the August 2026 version.
How House Expansion Works
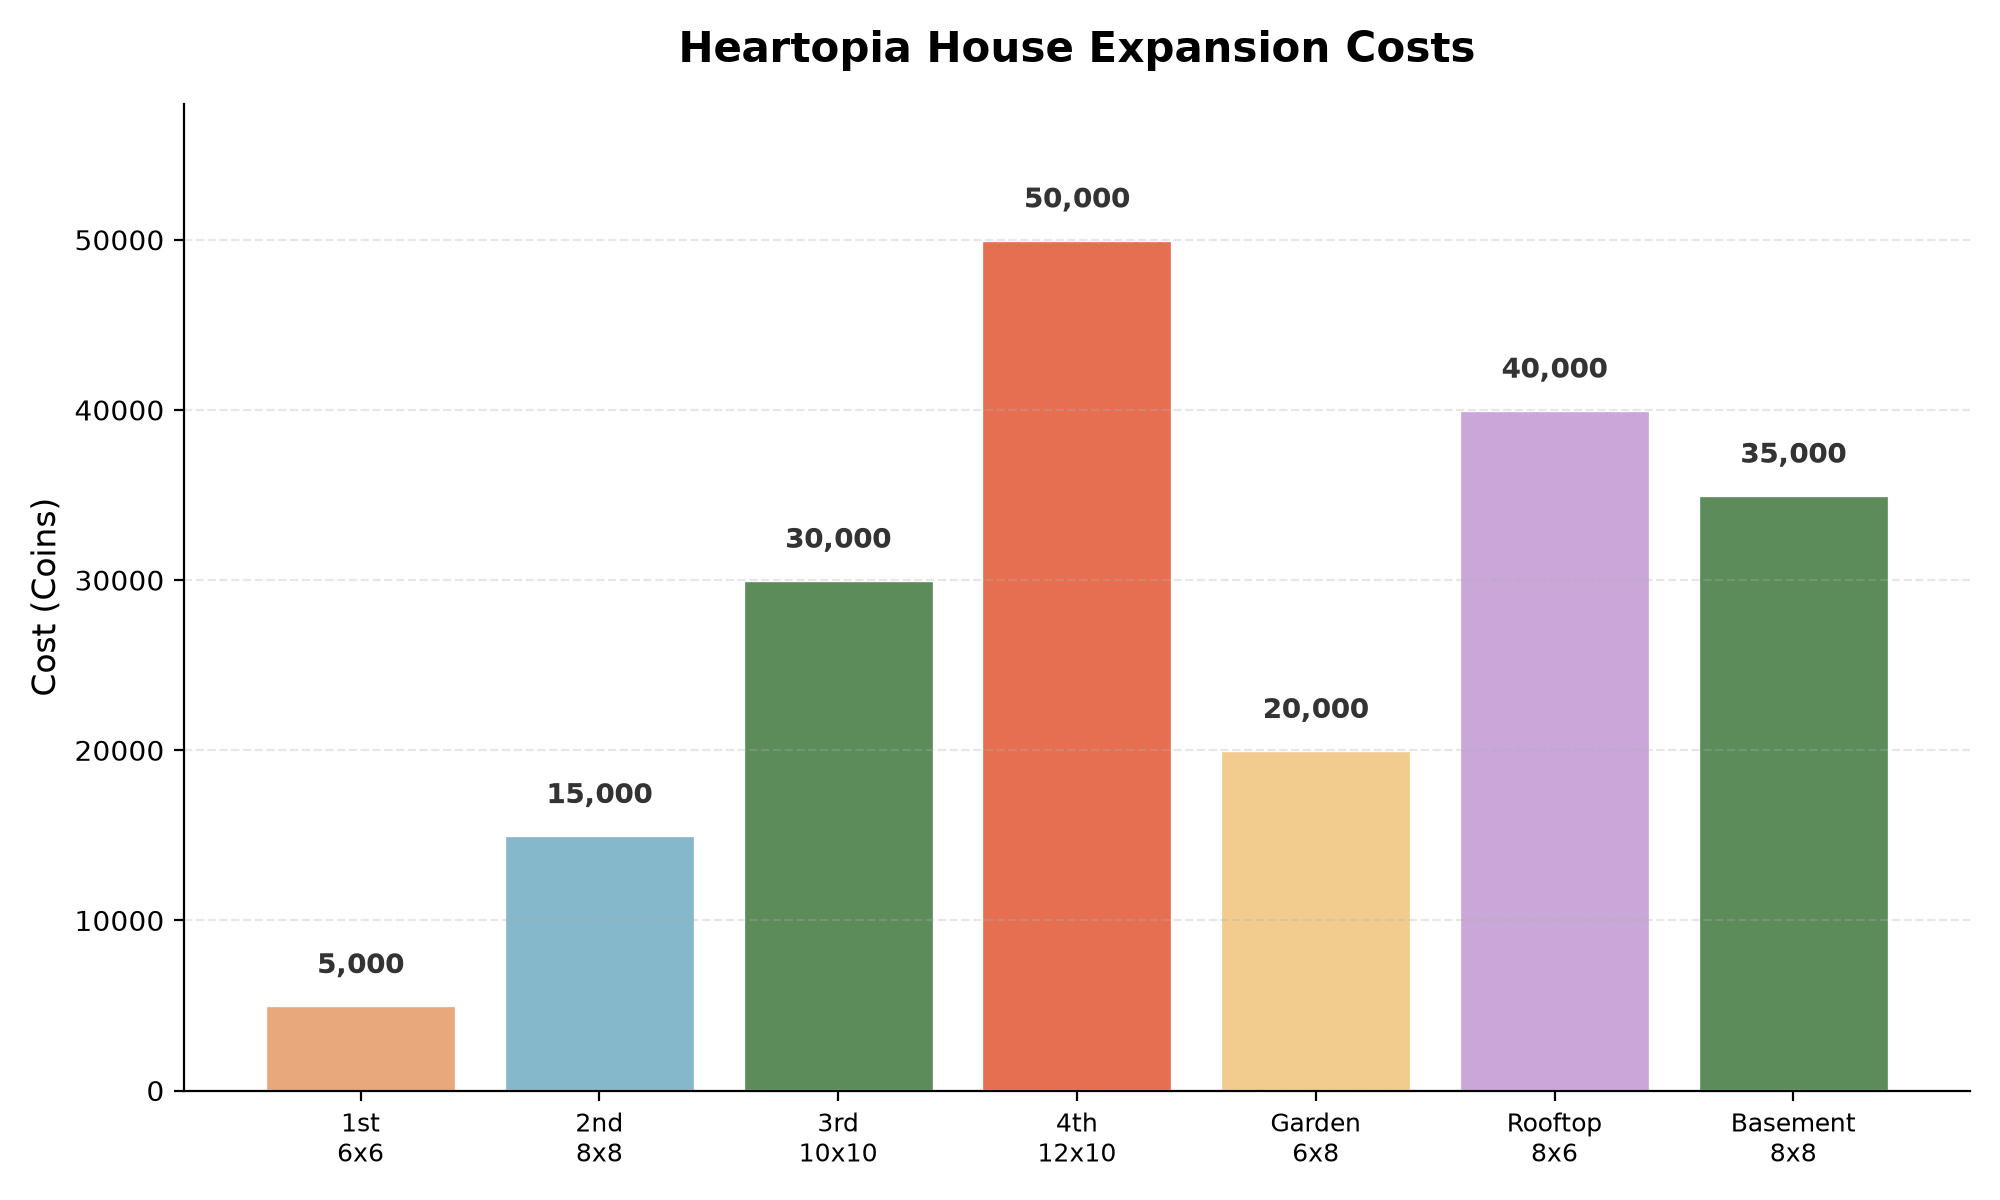
The player’s home starts as a single room, and every piece of living space is earned through the Expansion upgrade. Expanding is not optional for serious decorators — the base room can only hold a fraction of the furniture a full collection produces. Each expansion permanently adds a new room or outdoor zone, and the cost rises sharply with each tier.
- First Room (6×6): the starting space, free with the tutorial.
- Second Room (8×8): 5,000 Coins — the first real upgrade.
- Third Room (10×10): 15,000 Coins — unlocks mid-game layouts.
- Fourth Room (12×10): 30,000 Coins — large sitting and bedroom zones.
- Garden Zone (6×8): 20,000 Coins — outdoor furniture placement.
- Rooftop Zone (8×6): 40,000 Coins — seasonal decor and views.
- Basement (8×8): 35,000 Coins — storage and workshop rooms.
Order matters. The coin farming guide covers the fastest ways to stockpile the tens of thousands of Coins these expansions demand. Players who rush the second room early often stall out and cannot afford higher tiers, so pacing expansions alongside the Development Guild income is the reliable path.
Furniture Sources: Where Every Piece Comes From
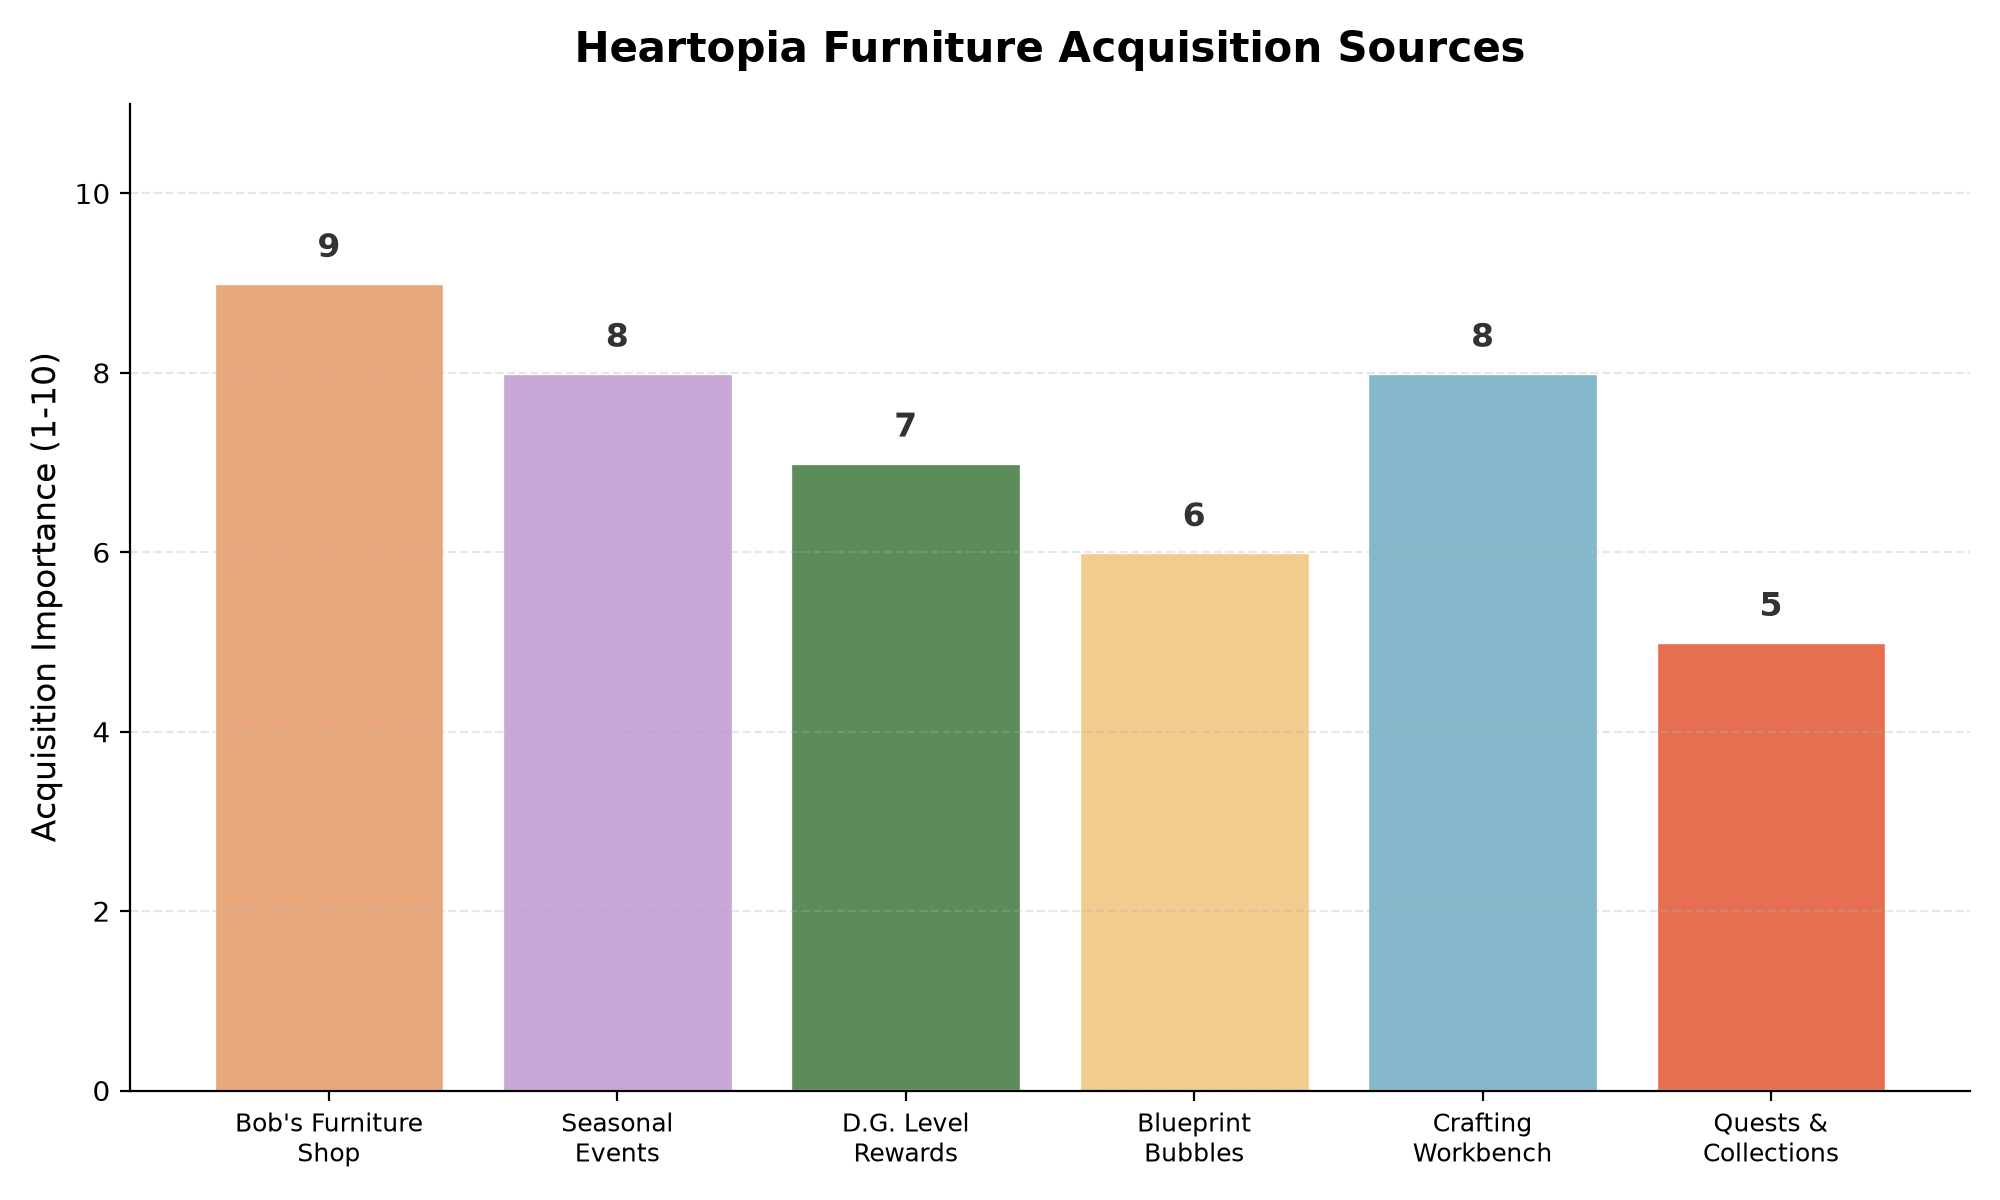
Heartopia furniture is not sold in one place. The collection spreads across six distinct acquisition channels, and a player who only checks one shop will never complete the catalogue. Understanding each source is the difference between a half-empty house and a fully decorated one.
- Bob’s Furniture Shop: the daily rotating shop, the largest and most reliable source of base sets.
- Seasonal Events: limited-time furniture that only appears during holiday events — most exclusive pieces live here.
- D.G. Level Rewards: furniture unlocked as the Development Guild levels up, tied to D.G. progression.
- Blueprint Bubbles: floating bubbles that drift across the map, each containing a craftable blueprint.
- Crafting Workbench: pieces built from gathered materials once a blueprint is learned.
- Quests and Collections: furniture awarded for completing story quests and collection milestones.
The practical rule is to never buy duplicates from a shop unless the piece is event-locked. Most furniture can be crafted from materials later, so Coins are better spent on event furniture and expansion tiers. The home building guide breaks down which furniture to prioritise for the Home Assessment score.
Crafting Materials: The 32-Material System
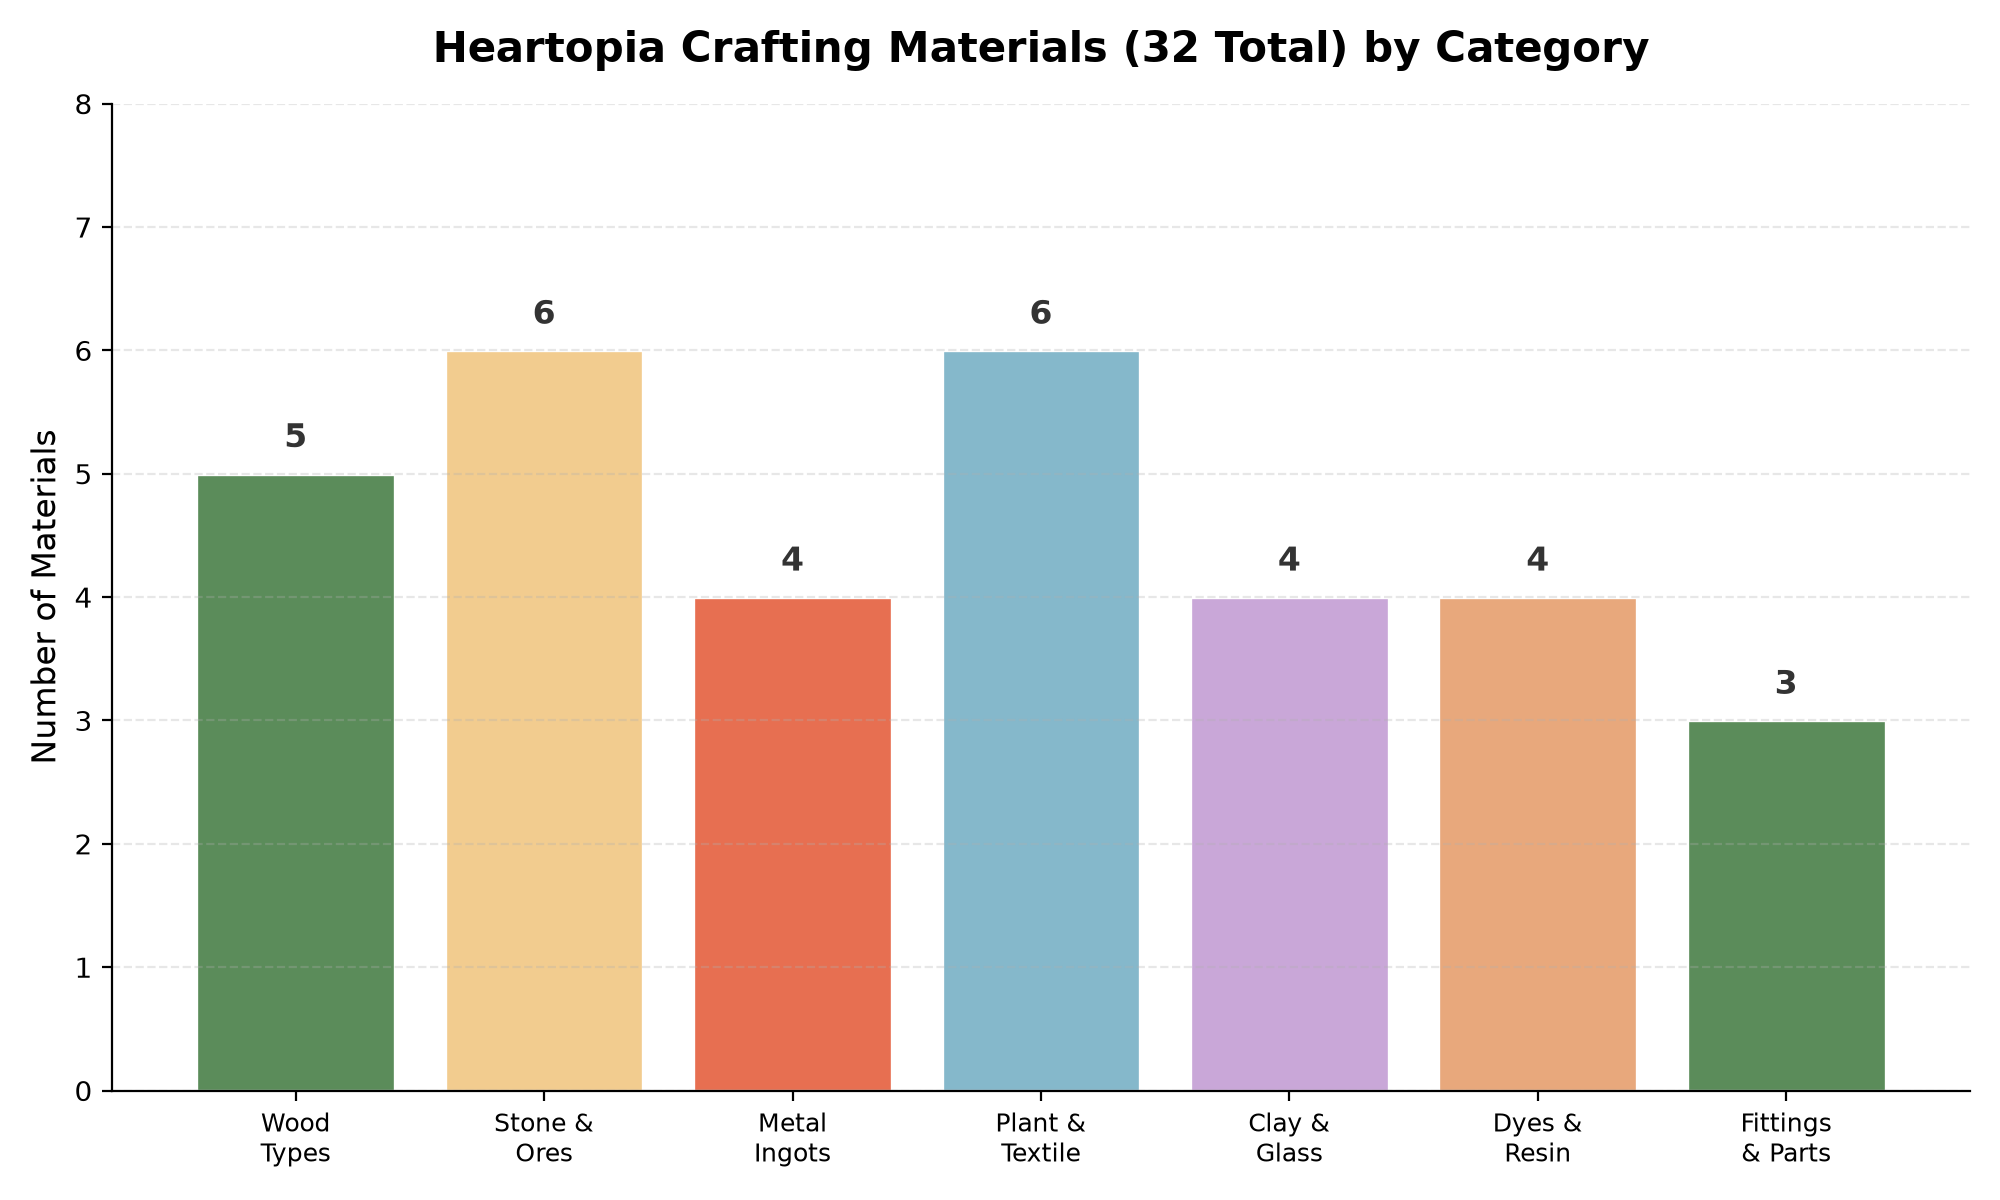
Crafting furniture consumes a shared pool of 32 crafting materials, grouped into seven broad categories. Unlike raw gathering, most materials are not farmable directly — they come from refining ores, processing plants, and recycling older furniture. A player who wants the high-end crafted sets must maintain a steady supply across all seven categories.
- Wood Types (5): base building material, gathered from trees and refined at the workbench.
- Stone and Ores (6): mined from rocks and ore veins around town.
- Metal Ingots (4): smelted from ores, required for premium frames.
- Plant and Textile (6): cotton, wool, and dyes used for soft furnishings.
- Clay and Glass (4): for ceramics and window pieces, kiln and glass furnace.
- Dyes and Resin (4): colour variants and finishing agents.
- Fittings and Parts (3): hinges, screws, and hardware from the shop.
The smartest early move is to unlock the crafting workbench upgrade that recycles unwanted furniture into base materials. This turns leftover event duplicates into a reusable supply, which keeps the seven material pools balanced without extra grinding. The hobby profit comparison shows which gathering hobby best feeds the material needs.
Home Assessment: Turning Furniture into a Score
Each week the game runs a Home Assessment that scores the player’s house on furniture count, variety, theme coherence, and room completion. The score is not cosmetic — a high Assessment unlocks bonus rewards and raises the player’s daily passive income. This makes furniture collection a direct gameplay investment, not just decoration.
The scoring favours variety over raw quantity. Placing ten different table types scores far higher than fifty copies of the same table. The assessment also rewards completing a themed set, so players should aim to finish matching furniture groups rather than mixing random pieces. The 25 things every new player should know includes the tip to start collecting complete sets early, since the weekly score compounds over time.
For free-to-play players, the zero-spend strategy guide explains how to reach a high Assessment using only crafted and quest furniture, avoiding the expensive shop sets entirely.
Fastest Route to a Full Home
Putting it together, the fastest route to a fully decorated home follows a clear order. First, save for the second room and unlock the garden, since outdoor slots are the cheapest way to add placement variety. Second, rush the D.G. level rewards that unlock the workbench recycling upgrade. Third, maintain the seven material pools through a single gathering hobby. Last, complete one themed set at a time to feed the Home Assessment score.
Because expansion costs and event windows are the two bottlenecks, the entire project is best scheduled around the weekly Home Assessment and the seasonal event calendar. A player who times the expensive Fourth Room purchase to a high-score week gets the biggest return on the largest Coin spend.
Common Furnishing Mistakes to Avoid
Most players make the same handful of errors when building out their home, and each one costs score and Coins in the long run. Recognising them early saves a full week of rework.
- Buying duplicates early: spending Coins on a second copy of a piece the player already owns delays the expensive room expansions. Duplicates only make sense for event-locked furniture that never restocks.
- Ignoring outdoor zones: the garden and rooftop add placement slots at a lower Coin cost than interior rooms, yet many players upgrade indoor rooms first and run out of cheaper space.
- Selling crafted materials: recycling unwanted furniture into base materials keeps the seven crafting pools healthy; selling them for a few Coins starves the workbench later.
- Skipping themed sets: the Home Assessment rewards completed sets far more than random single pieces, so mixing furniture types purely for looks leaves score on the table.
The expansion and feng shui guide explains how room placement affects the weekly score, while the museum collection guide covers the other long-term collection that rewards daily completion.
FAQ
Q: Should players expand rooms first or buy furniture first?
A: Expand before buying premium furniture. Added rooms provide more placement slots, which raises the Home Assessment high enough to fund the furniture purchases. Buying furniture into a single room wastes the score multiplier.
Q: Are event furniture pieces worth the high price?
A: Yes, for exclusivity. Event furniture is the only source for many themed sets and never returns cheaply, so grabbing event pieces when they appear is almost always worth the Coins.
Q: Can the Home Assessment be maximised without spending money?
A: Yes. Crafted and quest furniture can reach a high Assessment through variety and themed-set bonuses. The zero-spend guide covers the exact furniture mix that works.
Q: Do blueprint bubbles respawn?
A: Yes. Blueprint bubbles drift on a daily rotation across the map. Checking the same spots each day eventually reveals every craftable blueprint, including rare ones.