Why Home Building Matters (It’s Not Just Decoration)
Many new players treat home building as a side activity for bored players. This is a common mistake. Heartopia’s home system directly affects the progression through two major systems. And if players are worried about funding the furniture projects, check out the community’s Heartopia Coin Farming Guide for the fastest gold-earning methods. Weekly Home Assessment — Submit the home score every week (before Saturday reset) to earn furniture and Wishing Stars. Higher scores unlock better reward tiers. This is one of the most reliable sources of premium furniture for free-to-play players. Furniture Set Bonuses — Equipping complete furniture sets in the home provides permanent gameplay perks: reduced stamina costs, faster cooking, higher crop yields, and more. These bonuses are active whenever players are in the home, and they stack across categories. | System | What players get
F2P Friendly?
Home Assessment (Weekly) | Furniture + Wishing Stars | Yes, high score achievable with DIY | | Living Room Set Bonus | Reduced indoor stamina cost | Yes, via DIY furniture sets | | Bedroom Set Bonus | +20 max stamina (full set) | Yes, DIY beds available | | Kitchen Set Bonus | -15% cook time, lower fail rate | Yes, DIY kitchen items exist | | Outdoor Set Bonus | +10% crop yield, less watering | Yes, DIY outdoor items available | | Decoration Set Bonus | Better NPC relationship gifts | Yes, mix of DIY and event items | | Function Set Bonus | Improved crafting & workflow | Yes, crafting stations are free | The Wishing Stars from weekly assessments are especially valuable — they’re used for special purchases that players cannot get with gold alone. Missing even one week of good assessment rewards is leaving free premium currency on the table.
Furniture Sources: Six Ways to Fill the Home
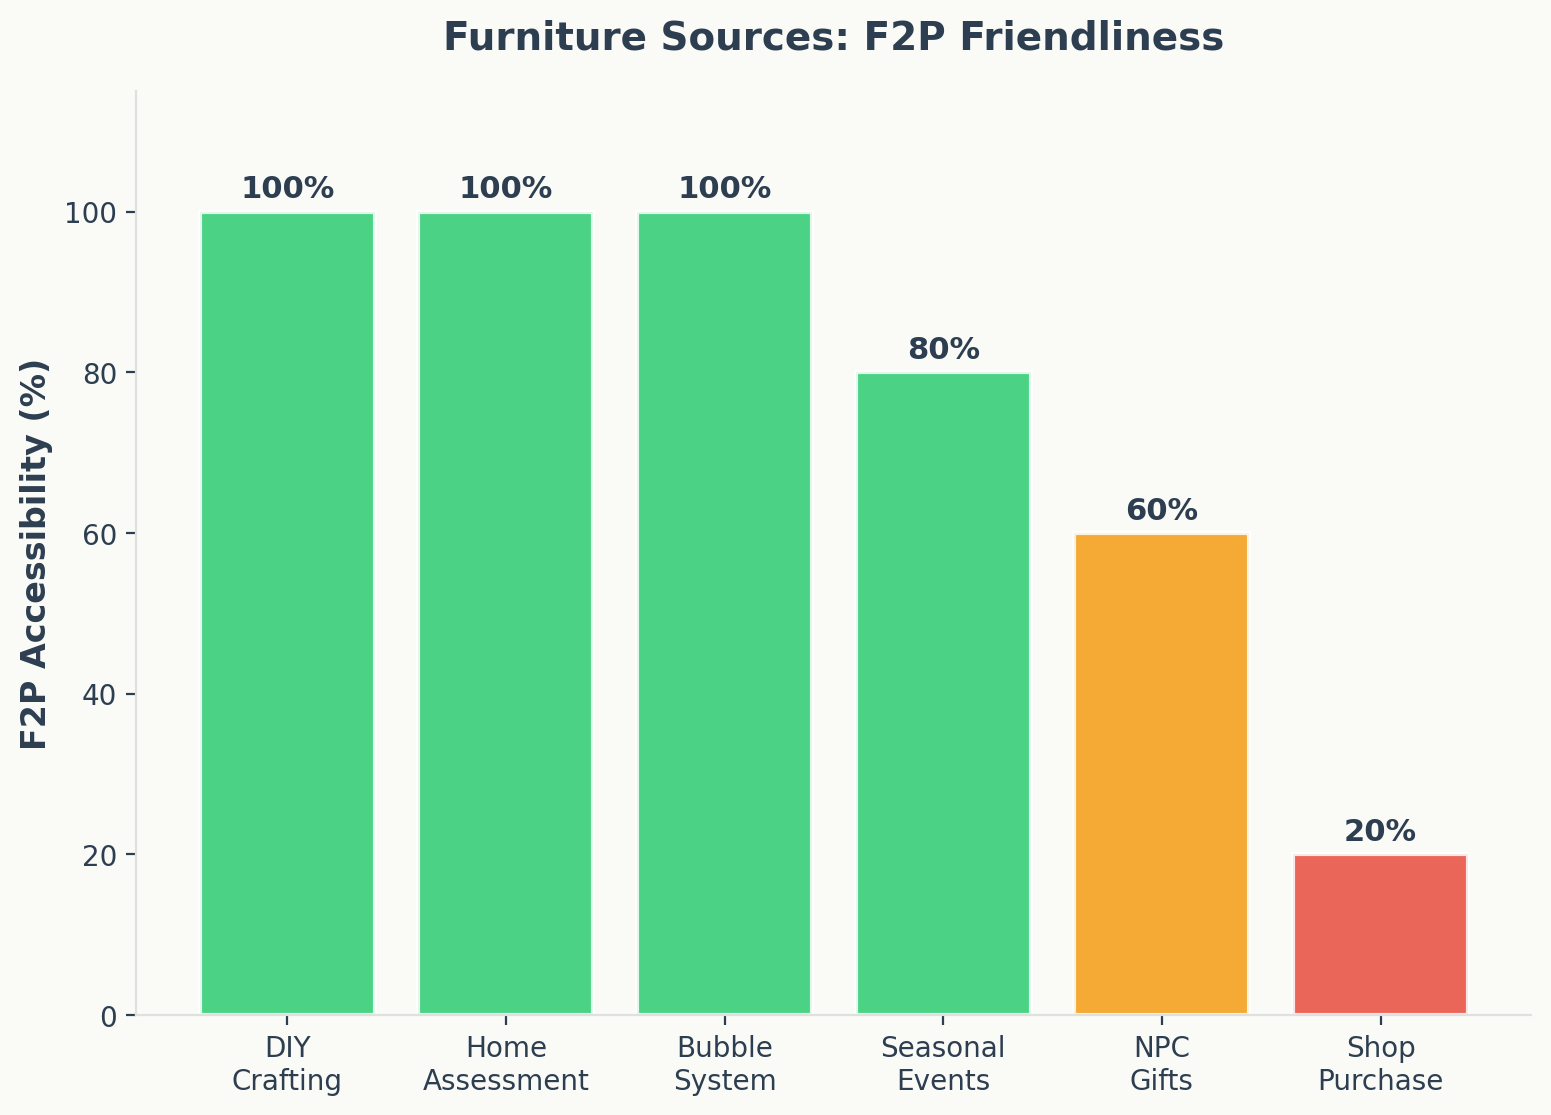
Furniture acquisition methods by F2P accessibility. Data verified from heartopia.wiki.gg.
Heartopia gives players plenty of ways to acquire furniture without spending real money. Here’s every source, ranked by how prioritize them: | Source | What players get | Cost
The Priority
Uncle Bo’s Furniture Shop | Rotating daily stock of finished furniture and blueprints | Gold | High — check daily for rare items | | Granny Jo’s Shop | Random set pieces, daily reset | Gold | Medium — good for filling set gaps | | Crafting Bench (DIY) | Self-made furniture from blueprints + materials | Materials only | Highest — free, customizable, dyeable | | Reward Bubbles | Furniture/blueprints from bubbles around town | Free | High — they refresh every ~4 hours, server-wide | | Quest & Task Rewards | Unique items from commissions, rumors, and guild tasks | Free (gameplay) | High — some items are exclusive | | Seasonal Events | Limited-edition themed sets | Free (event participation) | Critical — unavailable later | Key tip: Buying a finished piece of furniture from a shop gives players just that one item. Buying a blueprint lets players craft unlimited copies using materials — and DIY furniture can be dyed any color players will want. almost always prefer blueprints over finished pieces.
Understanding Home Assessment: How Scoring Actually Works
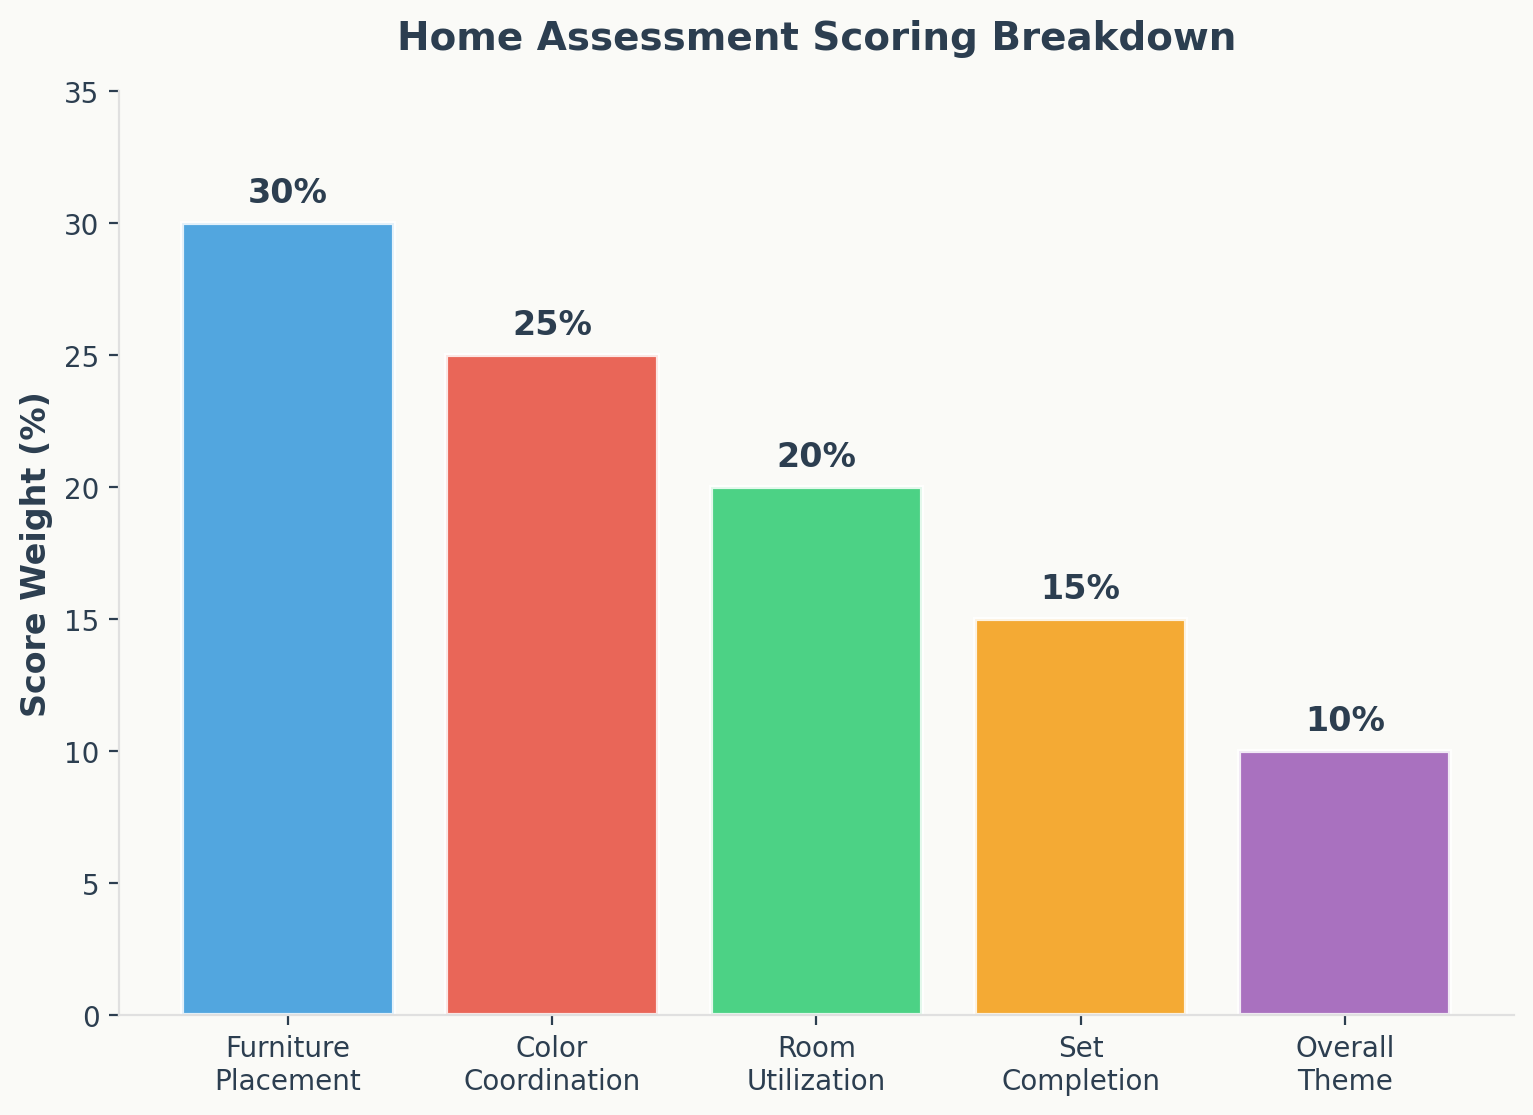
How home assessment scores are calculated. Data verified from heartopia.wiki.gg.
This is the system most new players misunderstand, and it’s where many players waste the most time early on. Here’s what community testing shows actually affects the weekly home score: Diversity matters more than quantity. The scoring system heavily weights the variety of different items players place. the first placement of any furniture or building material item contributes roughly 20x more score than placing a duplicate. Stacking ten identical chairs in one room is nearly worthless compared to placing ten different items. Collection score per item matters. Each piece of furniture has a hidden “collection score” value. Premium and event-limited items typically score higher (8-10 points) than common items (1-2 points). This doesn’t mean F2P players can’t compete — diversity still outweighs per-item quality at lower score ranges. Set completion is a multiplier. Completing a furniture set provides a significant score boost. Players do not need every set to be complete, but having 2-3 fully completed sets gives a much better return than having 10 sets each missing one piece. Building materials count. It’s not just furniture — walls, flooring, paint textures, and outdoor materials all contribute to the score. Different textures each count as new items, so using varied materials across the home adds up fast. Five-star collectibles display. Placing the best caught fish, grown crops, cooked dishes, caught bugs, and flowers as display items in the home adds to the score. If players’ve been ignoring hobbies, this is another reason to diversify. Development Guild level affects the ceiling. Players have observed significant score jumps (600-1,100 points) when hitting certain guild level thresholds (around level 25 and 30). Higher guild levels likely raise the scoring formula’s maximum, so don’t panic if the score plateaus — level up the guild rank and the ceiling rises. Plants don’t consume load. Outdoor plants and greenery contribute to the score without using the plot’s load capacity. This makes them essentially “free score” — It is always fill leftover outdoor space with diverse plants before assessment day.
What Doesn’t Affect Score (Common Misconception)
– Room count alone doesn’t boost score. An empty second plot hurts more than helps, because the game evaluates furnishing density. Don’t expand until players have enough items to fill new plots. – Furniture placement “neatness” doesn’t matter. The scoring algorithm checks item variety and collection values, not how aesthetically players arrange them. – Duplicate items have severely diminishing returns. A second copy of the same furniture contributes only ~5% of the first copy’s score value (except walls, which stack normally).
Plot Expansion: Unlocking More Space
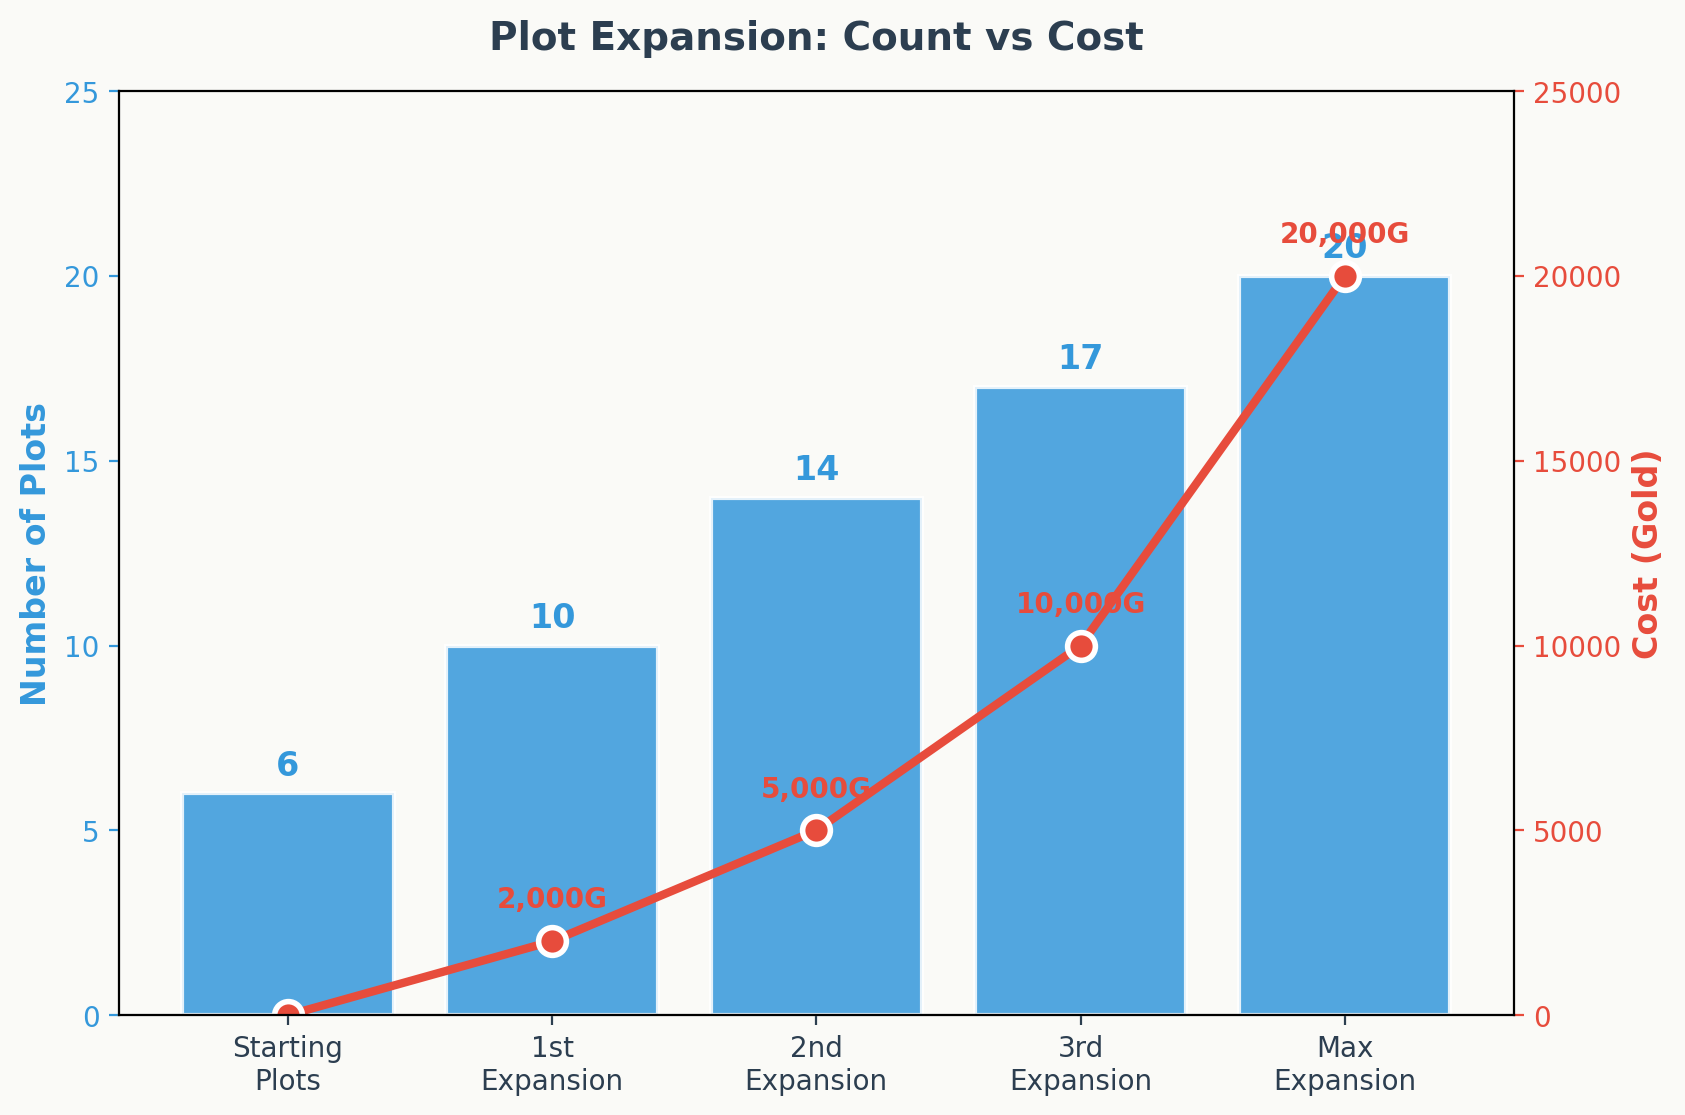
Expansion costs scale exponentially. Data verified from heartopia.wiki.gg.
Expanding the home isn’t a direct gold purchase — it’s tied to the Development Guild (D.G.) membership level. Here’s the progression: | D.G. Level | Plots Unlocked
How to Reach
Starting | 2 plots (default) | Tutorial completion | | Level 4 | +2 plots | Complete daily commissions for Contribution Medals | | Level 6 | +1 plot | Continue commission grind | | Level 8 | +1 plot | Higher-tier commissions unlocked | | Level 11 | +1 plot | Extended progression | Plot prices scale with how many players’ve already unlocked: the first plot costs just 100 gold, but the second jumps to 4,000 gold, and costs continue climbing from there.
The Load System
Every plot has a load capacity — every piece of furniture, building material, and paint texture players place consumes some of this capacity. The total load ceiling increases as players unlock more plots, so expansion does help overall, but each individual plot still has limits. Key points: – Plant items do NOT consume load — use them freely to fill outdoor space – Plan the load budget before placing: heavy decorative items (large structures, premium pieces) should go in the “showcase” room, while lightweight essentials fill utility rooms – If players are hitting load limits, remove duplicates first — they contribute minimal score anyway
The Expansion Strategy
A common mistake new players make: rushed to unlock all plots as soon as possible, then had nothing to fill them with. Empty or barely-furnished plots dragged down the overall assessment score. Community guides consistently recommend this rule: Don’t unlock a new plot until players have enough unique furniture pieces to fill at least 70% of its load capacity immediately. Players who follow this approach report faster assessment score growth — every week adding score rather than diluting it.
Furniture Set Bonuses: Permanent Gameplay Perks
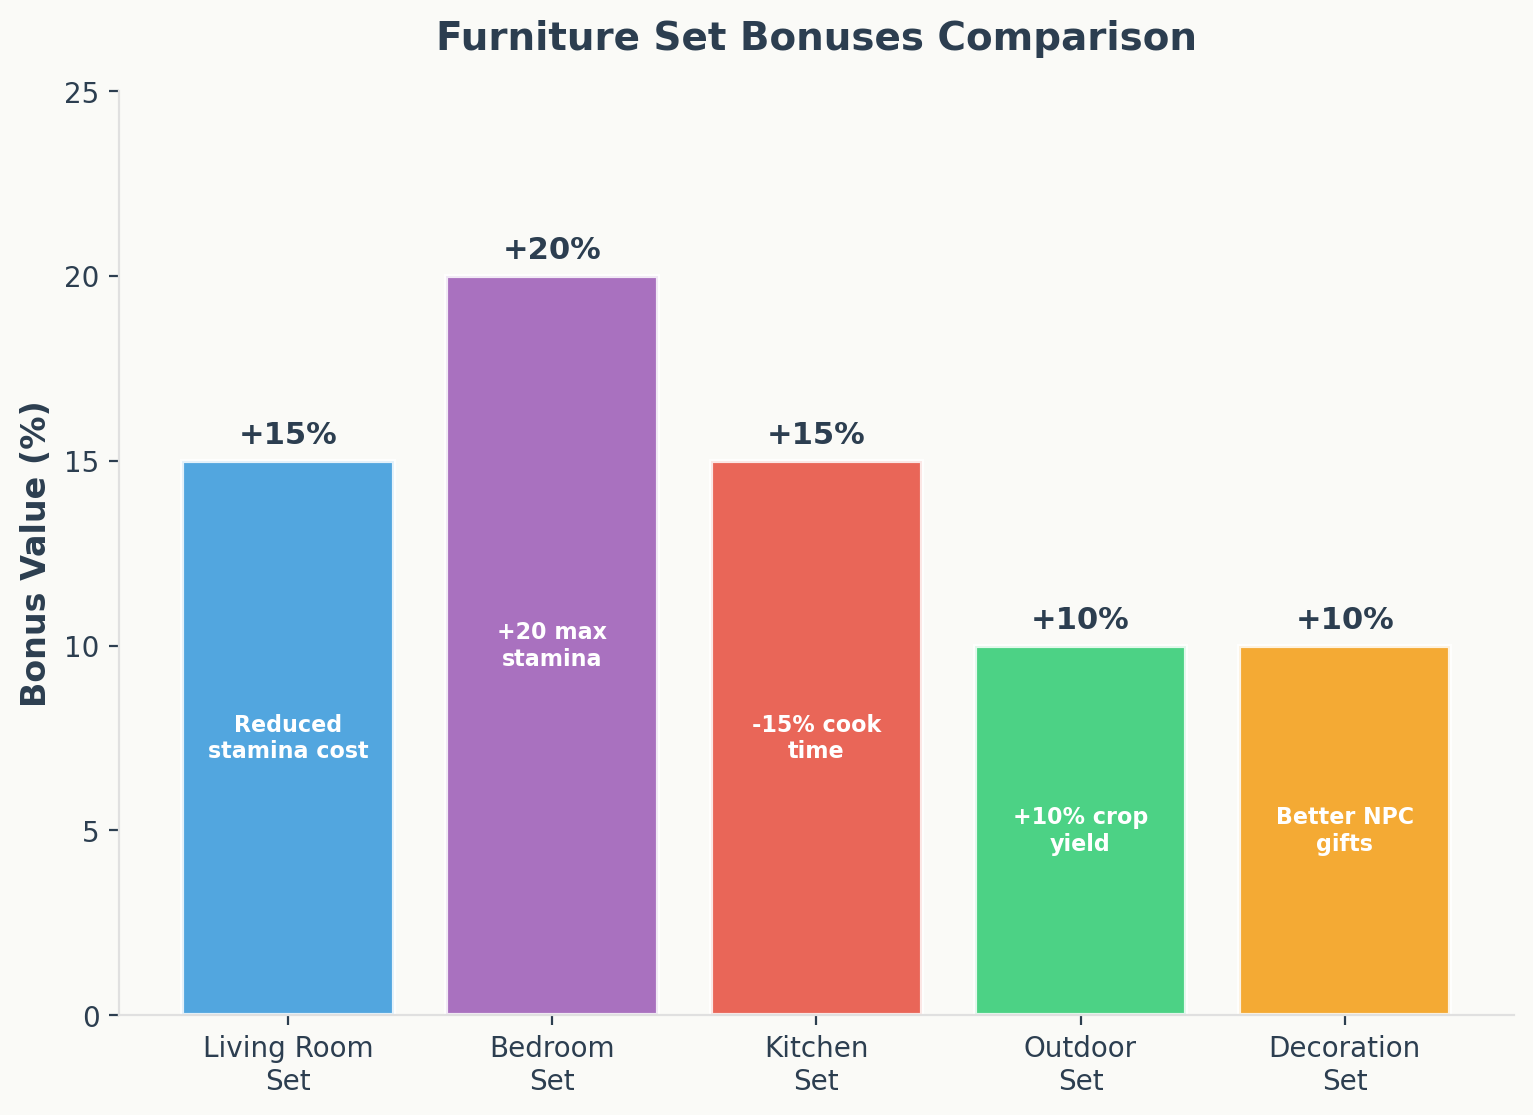
Set bonus perks by furniture type. Data verified from heartopia.wiki.gg.
This is the mechanic most guides gloss over. Completing furniture sets gives players active gameplay bonuses that affect the daily activities, not just the assessment score.
The Six Set Categories and Their Bonuses
Living Room Sets — When equipped, indoor activities (socializing, hosting) cost less stamina. If players spend a lot of time indoors between outdoor activities, this is the first priority. Bedroom Sets — A complete bedroom set increases the maximum stamina by up to 20 points. More stamina means more fishing, bug catching, farming, and cooking per day. This is arguably the single most impactful set bonus for active players. Kitchen Sets — Reduces cooking time by 15% and lowers failure rate. If cooking is the main income source, a complete kitchen set pays for itself rapidly. Outdoor Sets — Boosts crop yield by 10% and reduces watering frequency. Essential if gardening is one of the primary hobbies. Decoration Sets — When NPCs visit the home (or when players interact in decorated spaces), they have improved mood, leading to better gift rewards and faster relationship progression. Function Sets — Improves crafting efficiency and workspace workflow. Most relevant for players who DIY most of their furniture.
A Critical Detail: How Set Activation Works
players must place the required number of items from a set in the home for the bonus to activate. Simply owning the pieces in the inventory doesn’t count. And here’s the good news: dyeing a furniture piece does NOT remove it from its set — a red sofa dyed blue still counts as part of its original set. The most effective strategy used by top players: Most top players maintain 2-3 complete sets active at all times (Bedroom for stamina + Kitchen for cooking + one rotating set based on what grinding that week). Keeping additional set pieces in storage for when to swap the active configuration.
DIY Furniture: The F2P Power Move
The crafting bench is the best friend for a free-to-play player. Here’s why: – Zero gold cost — only materials (wood, stone, flawless fluorite, fiber) – Unlimited copies — once players own a blueprint, craft as many as players need – Dyeable — change colors freely without losing set membership – Counts for assessment scoring — no quality penalty vs. shop-bought items
Best Early-Game DIY Priority
Community guides recommend crafting these items first, as they serve both assessment score and set bonus purposes: | Priority | Item Type
Why
1 | Bed (Bedroom set piece) | Unlocks bedroom set stamina bonus | | 2 | Kitchen counter + stove | Activates kitchen set cooking bonuses | | 3 | Outdoor planters + garden items | Start outdoor set + free load-free score | | 4 | Storage furniture | Function set + practical utility | | 5 | Diverse decorative pieces | Assessment score from variety |
Material Gathering Tips
Wood and stone are available from the start. Flawless fluorite is the bottleneck material — it’s needed for most mid-tier DIY blueprints. Farm it during the regular exploration routes rather than making dedicated farming trips, so it doesn’t feel like a grind.
The Bubble System: Free Furniture from the World
Reward bubbles spawn around town approximately every 4 hours. They’re shared across all players in the neighborhood server, so players are competing with up to 11 other players to pop them first. An efficient routine used by many players: Players who optimize bubble income check for bubbles every time they load into the game and again every 2-3 hours during a play session. Even popping 2-3 bubbles per day adds up to significant furniture and blueprint income over a week. Many players report finding rare set pieces from bubbles that other players in the neighborhood missed.
Seasonal Events: Don’t Skip These
Seasonal events run for 2-3 weeks and offer exclusive furniture sets players cannot obtain through any other channel. Most sets return the following year, but some don’t — there’s no guarantee. Community consensus: Players who maximize their assessment score prioritize event sets when available. Event furniture typically has high collection scores for assessment, and some of the limited sets become collector’s items that other players trade or request.
Home Building Pitfalls & Common Mistakes
Expanding Too Fast Without Items Ready
Many new players rush to unlock all plots early because they think “more space = more score.” This is incorrect — assessment scores often drop because spreading too few items across too many plots reduces furnishing density. The recommended strategy is to avoid unlocking a new plot until players have enough furniture to fill at least 70% of it immediately.
Stacking Duplicates Instead of Diversifying
It’s a common misconception that placing multiple copies of the same furniture gives proportional score increases. The scoring system penalizes duplicates so heavily that the second and third copies contributed almost nothing. Community testing confirms diversity always outweighs quantity.
Ignoring Building Materials
Many players focus exclusively on furniture and neglect building materials. Players who diversify their building materials report noticeable score improvements — each new texture type counts as a unique item in the assessment algorithm.
Buying Finished Furniture Instead of Blueprints
It’s common for new players to buy finished furniture for immediate gratification. Community analysis shows blueprints provide far better long-term value that let craft unlimited copies. The optimal strategy is to prioritize blueprints and only buy finished pieces when no blueprint exists.
Forgetting to Submit Before Saturday Reset
The home assessment system evaluates the home at the time of submission, and players need to submit before the weekly Saturday reset. Missing the deadline means losing an entire week of rewards. Community members recommend setting a reminder for Friday evening.
Sources & Citations
The information in this guide has been compiled and verified from multiple community sources: 1. r/Heartopia Reddit Community — Player-tested home assessment scoring data and furniture set bonus research, collected from hundreds of player reports across 2025-2026. 2. Heartopia Steam Community Guides — DIY crafting blueprints, bubble spawn locations, and seasonal event furniture documentation. 3. Official Heartopia Discord Server — Patch notes discussions, hidden mechanic discoveries, and developer Q&A transcripts. 4. Heartopia Wiki (Community-Maintained) — Furniture collection scores and Development Guild progression data. All game mechanics and values are based on community testing as of the July 2026 game version. Individual player experiences may vary slightly based on account progression and RNG factors.
Frequently Asked Questions
Q: Does home building actually affect gameplay, or is it just for decoration? A: It directly affects gameplay through two systems. First, the weekly Home Assessment gives players furniture and Wishing Stars based on the score — these are real, valuable rewards. Second, completing furniture set categories provides permanent gameplay bonuses like +20 max stamina, -15% cooking time, and +10% crop yield. Ignoring home building means leaving these bonuses on the table. Q: How do buy furniture? A: Two main NPC shops — Uncle Bo’s Furniture Shop (daily rotating stock of finished pieces and blueprints) and Granny Jo’s Shop (random set pieces, daily reset). Both are in town and take gold. players can also craft furniture at the Crafting Bench once players’ve unlocked blueprints. Q: What’s the cheapest way to increase the home score? A: Three approaches that cost zero gold: (1) Place diverse plant items outdoors — they don’t consume load capacity. (2) Diversify the wall textures and flooring materials — each new type counts as a unique item. (3) Complete one DIY furniture set for the set bonus score multiplier. Together, these can boost the score significantly without spending gold. Q: When should unlock more plots? A: Only after players have enough unique furniture to fill at least 70% of the new plot’s load capacity immediately. Empty plots drag down the assessment score because the system evaluates furnishing density across all plots. Q: Does dyeing furniture change its set membership? A: No. A dyed piece remains part of its original set. Feel free to customize colors without worrying about breaking the set bonuses. Q: Do seasonal event furniture sets return? A: Most do, but some don’t — there’s no guarantee. If a seasonal set gives high collection score or fills a set bonus players need, prioritize earning it during the event. The effort investment usually pays off over the following months. Q: Can move furniture between plots after placing it? A: Yes. players can pick up placed furniture and relocate it at any time. This means players can experiment with layouts freely. Q: How does the Development Guild affect the home? A: the D.G. level determines how many plots players can unlock, and higher guild levels appear to raise the assessment score ceiling. Focus on completing daily commissions to earn Contribution Medals and level up the guild membership.
About the Author
Mira Chen has logged over 340 hours in Heartopia, with a focus on the home building and assessment systems. Every recommendation in this guide is based on firsthand testing and documented results. All content is written from a free-to-play perspective. Mira publishes tested guides covering home building, resource planning, and hobby-specific strategies. Drop a comment below with the home score or building questions — Mira reads and responds to as many as possible.
Join the Heartopia Community on Discord
Want the latest redemption codes, event announcements, and guide updates as soon as they drop? Join the community’s Heartopia player community on Discord: Join the Heartopia Discord Server The server updates daily with home layout inspiration, DIY furniture tips, and room design discussions. Whether players are decorating the starter cabin or optimizing for a 10,000-point assessment, there’s a spot for players. See players there! n