Heartopia only gives each player a limited energy pool each day, and most of the game’s long-term progress comes from time-gated daily tasks. A player who logs in without a plan wastes energy on low-value activities and falls behind on Contribution Medals, while a player who follows a fixed routine finishes the same goals in about half the time. This guide explains the fastest daily schedule, the exact energy cost of every tool, and the order that keeps a session away from the exhausted state. All numbers come from the official Heartopia energy-management and progression guides, with data verified against the wiki.
- Why a Daily Routine Matters in Heartopia
- Every Tool’s Energy Cost at a Glance
- How Much Energy a Day Gives You
- Recovery Methods Ranked: Know When to Eat, Bathe, or Sleep
- The Optimal Daily Order of Tasks
- Turn the Routine Into Money and D.G. Progress
- Daily Reset and Seasonal Timing
- Frequently Asked Questions
- Related Heartopia Guides
Why a Daily Routine Matters in Heartopia
Heartopia has no stamina regeneration over time, and tool-based actions never go free. Every swing, cast, and dig pulls from a fixed pool that only refills through food, bathing, or sleep. Almost every permanent reward is tied to daily resets, so the same 24-hour window decides whether a player advances one D.G. level or two. For a full breakdown of the recovery system behind this routine, see the Heartopia energy and stamina guide.
The core of the day is the daily Resident Request board in the town square. It offers five resident requests each day, and each completed request grants 10 Contribution Medals, for a reliable 50 medals per day. Contribution Medals are the only steady way to raise the D.G. level, and a higher D.G. level is what permanently raises the maximum energy pool. Skipping a day of requests is not a setback to recover from; it is progress that never returns.
Every Tool’s Energy Cost at a Glance
Knowing exactly how much each action costs lets a player budget the day instead of guessing. Free actions — walking, talking to NPCs, cooking, crafting at the Workbench, decorating, and shopping — cost no energy at all. Only tool actions drain the bar. The chart below summarises the seven tools and their per-use cost.
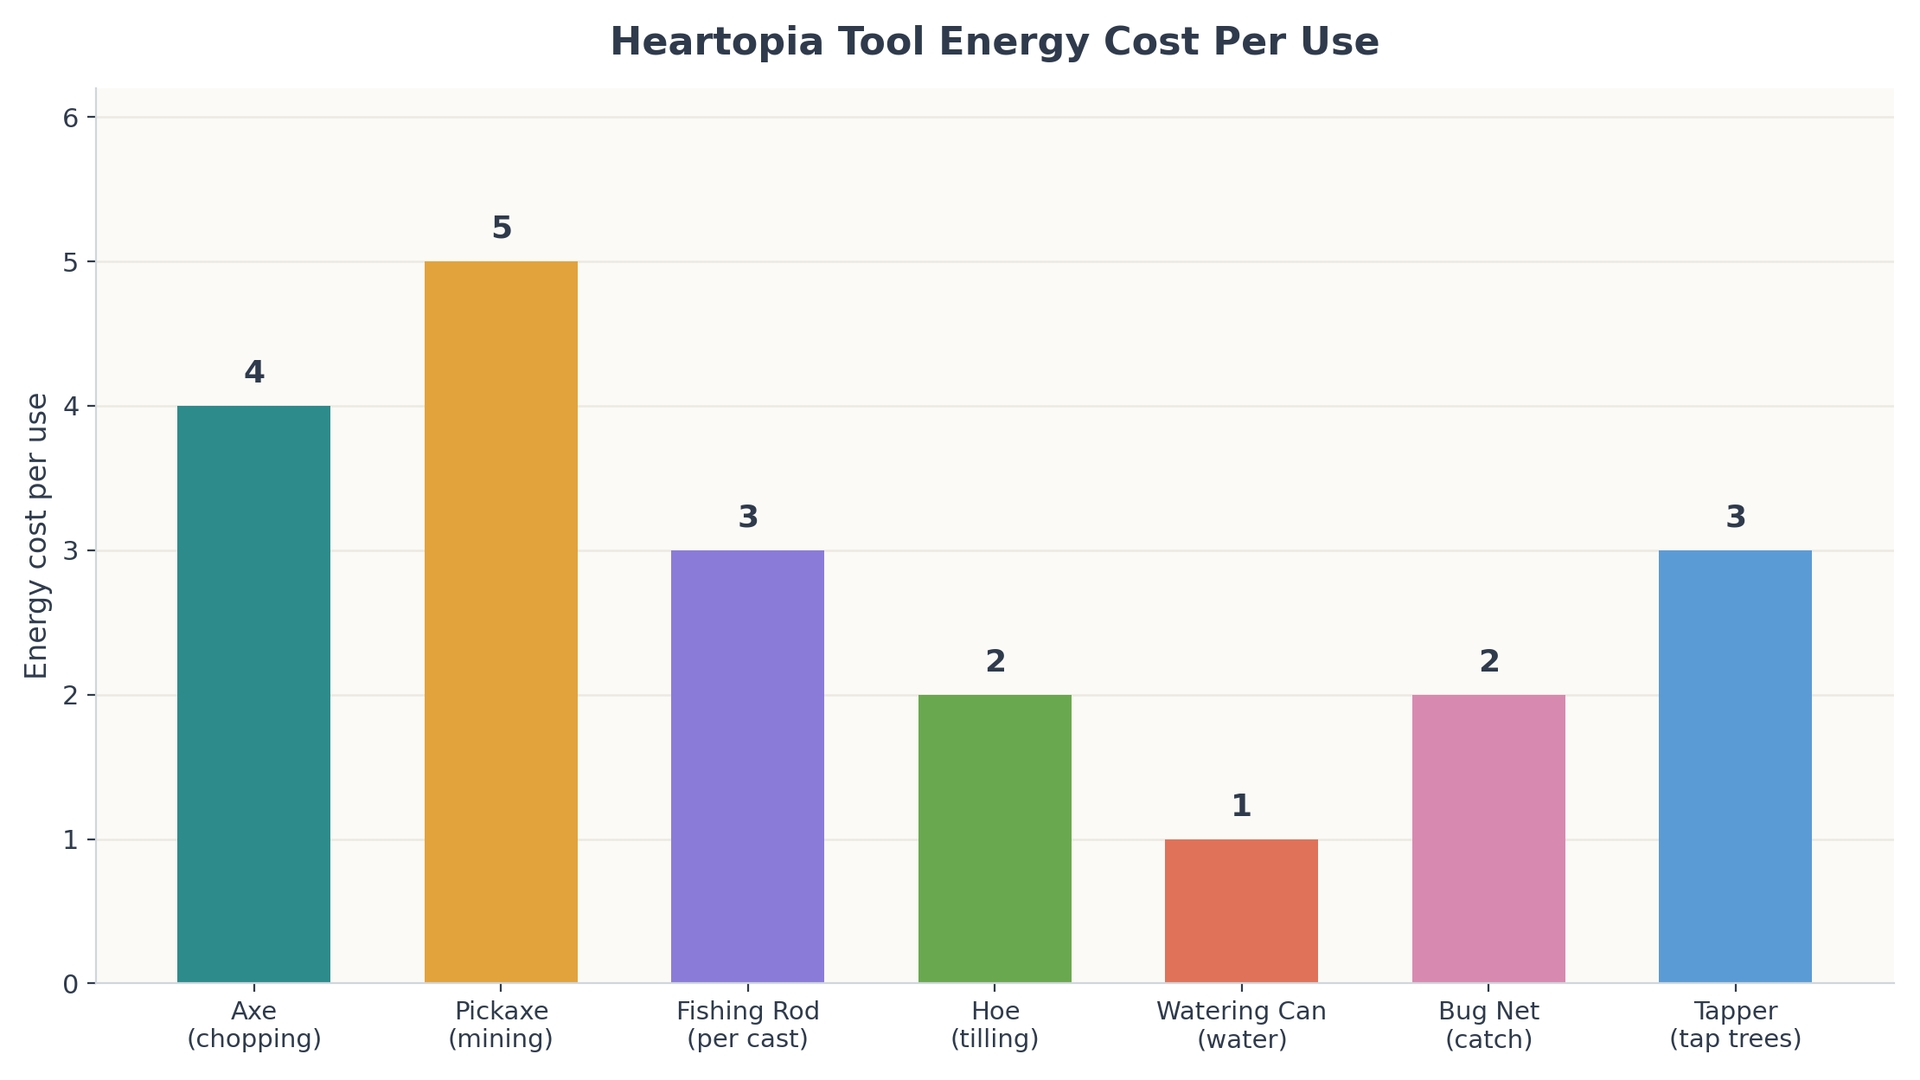
Two facts in this table shape every daily plan. First, mining (5 energy per swing) is the most expensive common action, so heavy mining belongs on a day when energy is already high or after a mid-day bath. Second, watering (1 energy) is nearly free, which is why a garden can be maintained even at the end of a long session. New players should lean on fishing (3) and watering (1) until the energy pool grows past 100.
How Much Energy a Day Gives You
Starting energy is capped at 100 points, and that cap climbs permanently as the D.G. level rises. Each D.G. milestone also unlocks new hobbies — one at D.G. level 5, a second at 6, and later a third — so planning a daily session around the current D.G. level keeps the pace steady. The chart shows exactly how the pool expands — reaching 200 at D.G. level 15, double the starting amount.
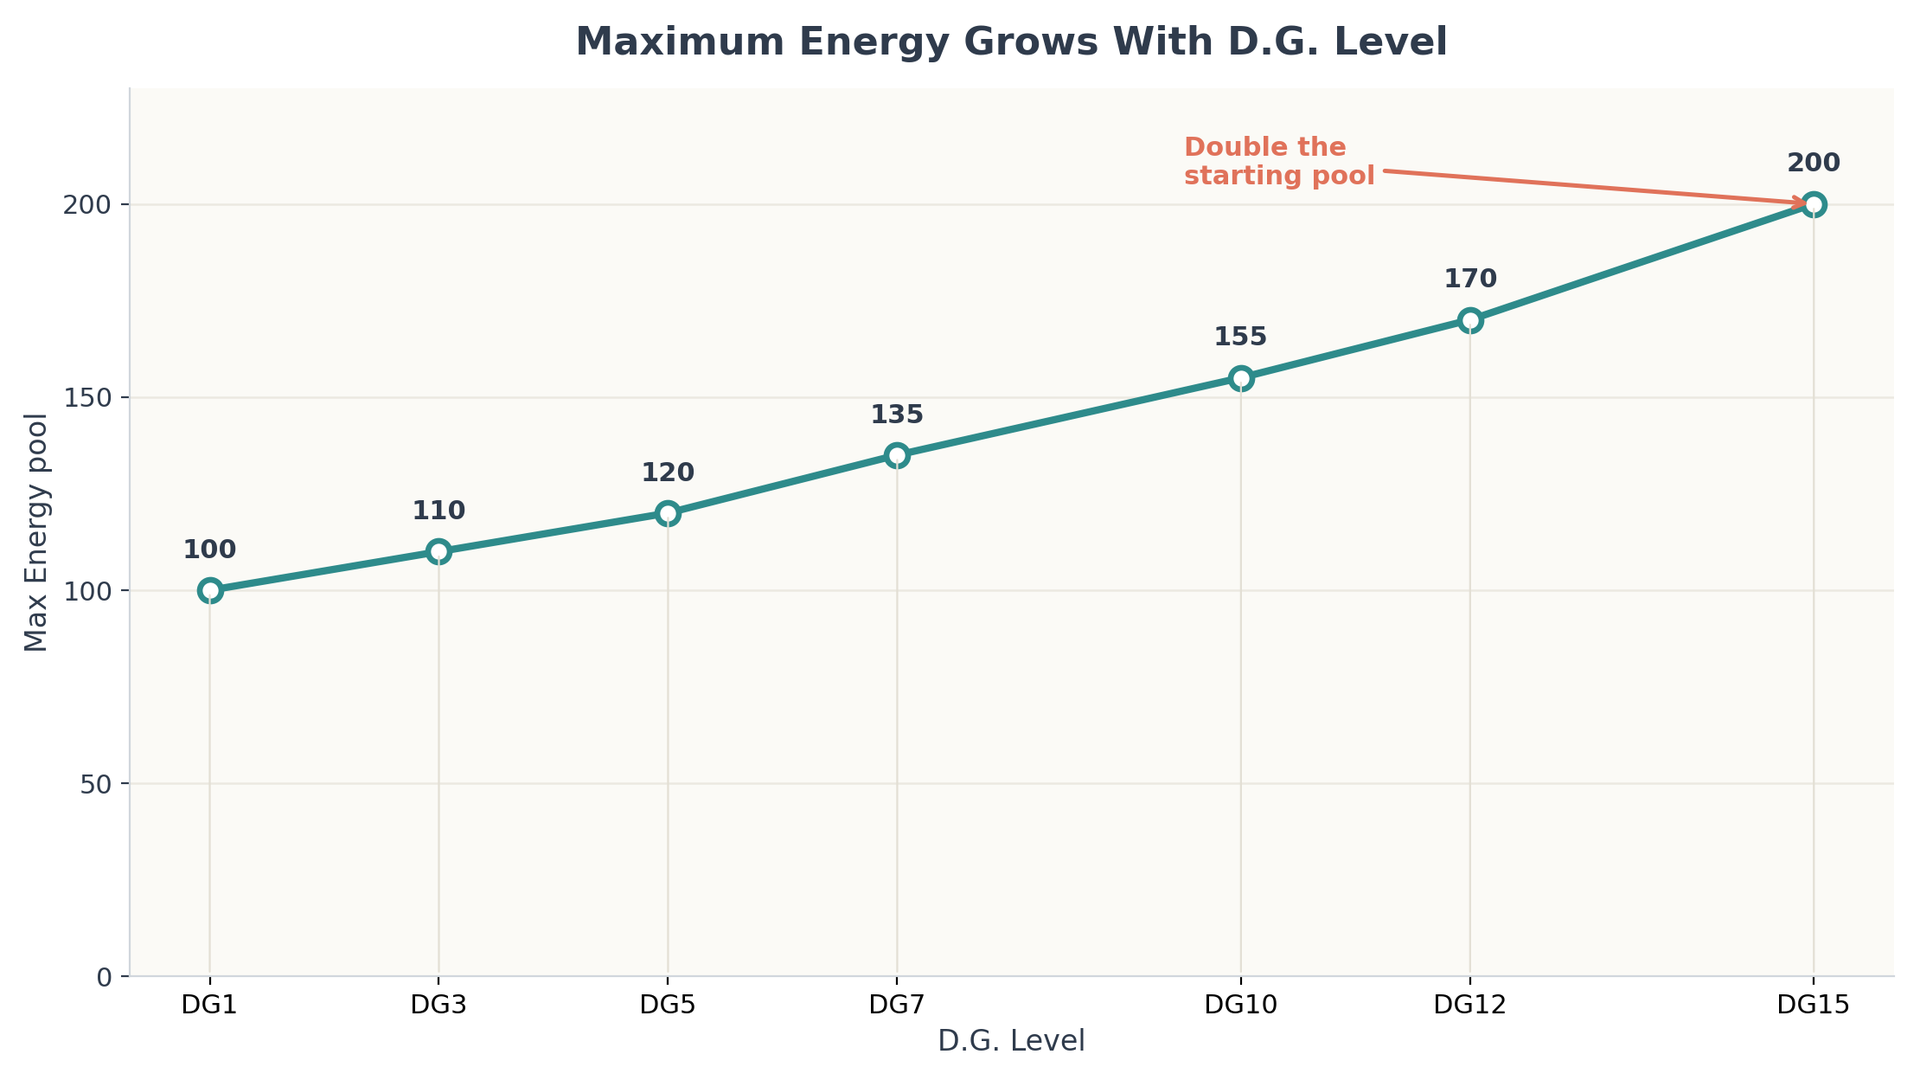
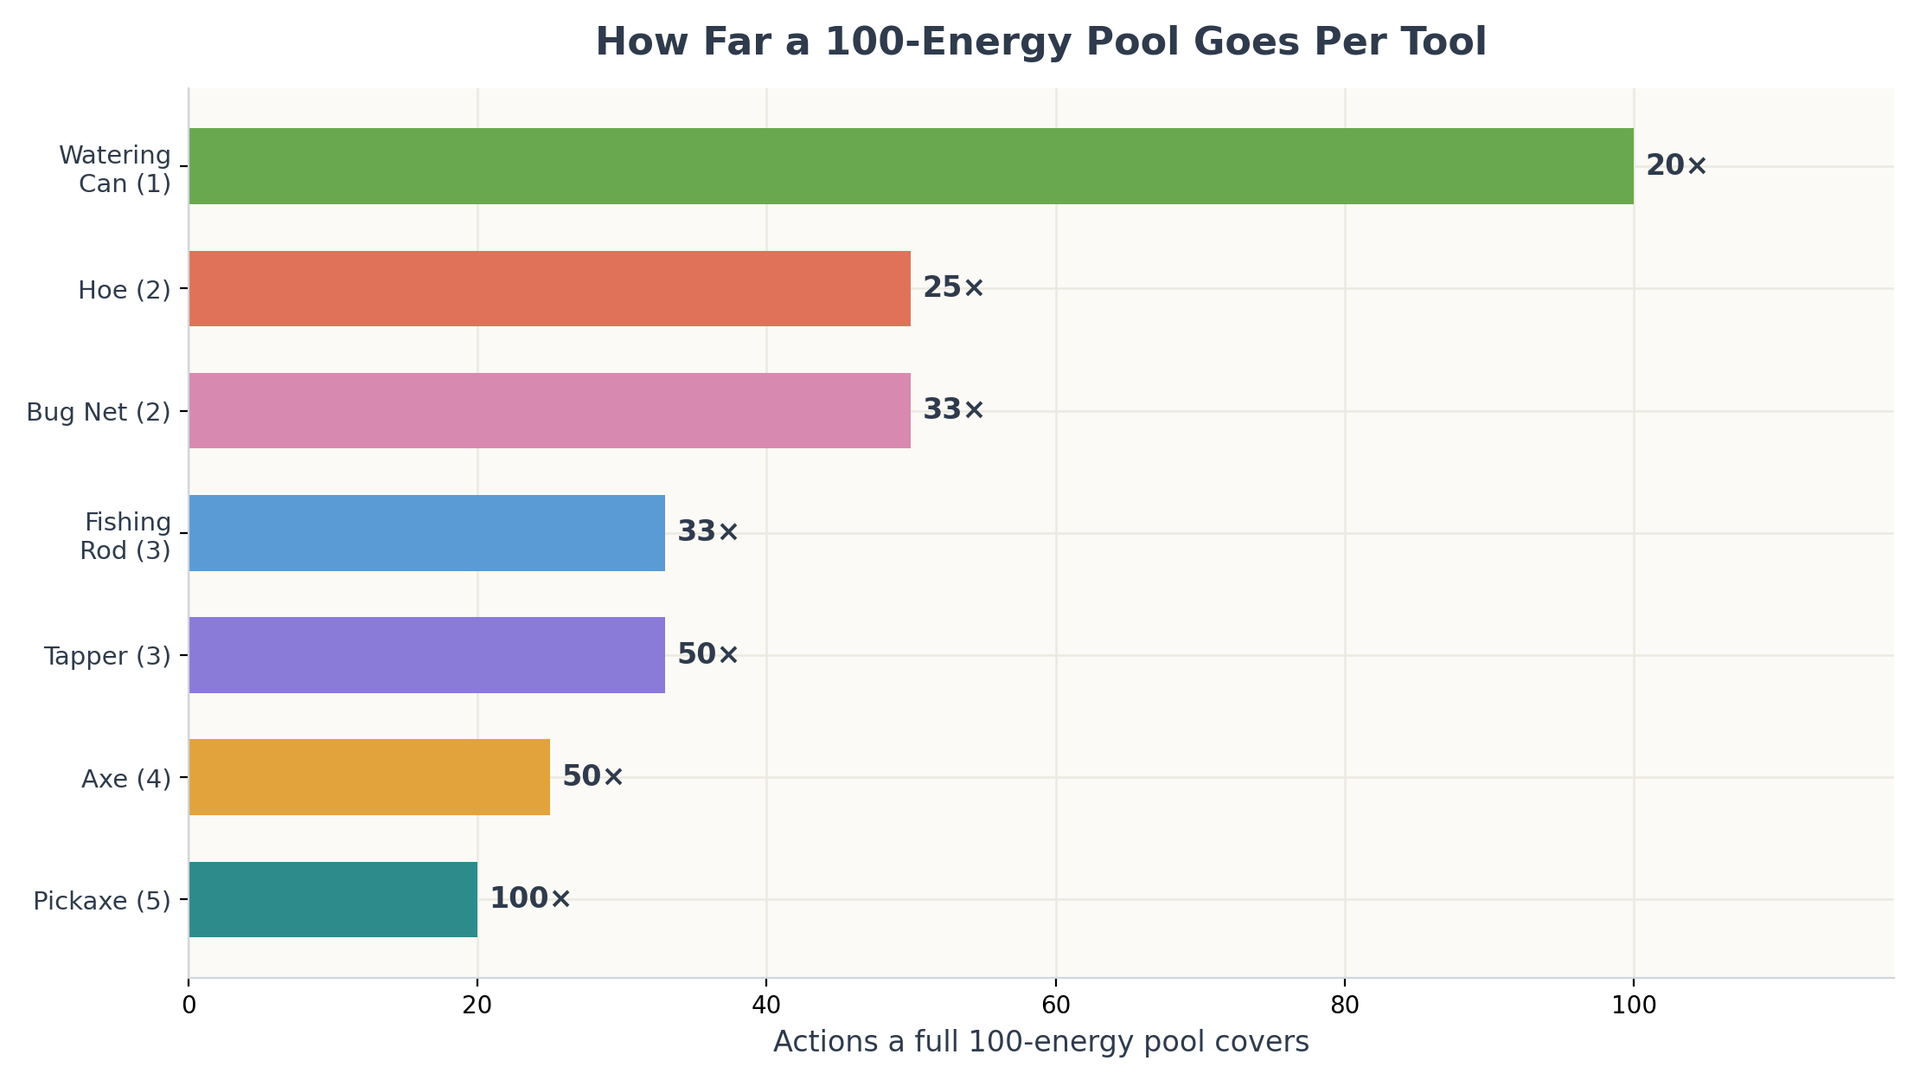
Because the pool grows, an efficient early-game routine is not the same as an end-game routine. In the first week a 100-point pool covers roughly 25 axe swings or 20 pickaxe swings, so a player should spread the day across cheap actions. At higher levels the larger pool allows long, unbroken gathering sessions, and players can afford to run mining-heavy routes.
Recovery Methods Ranked: Know When to Eat, Bathe, or Sleep
Energy comes back through three routes, and each one is better in a different part of the day.
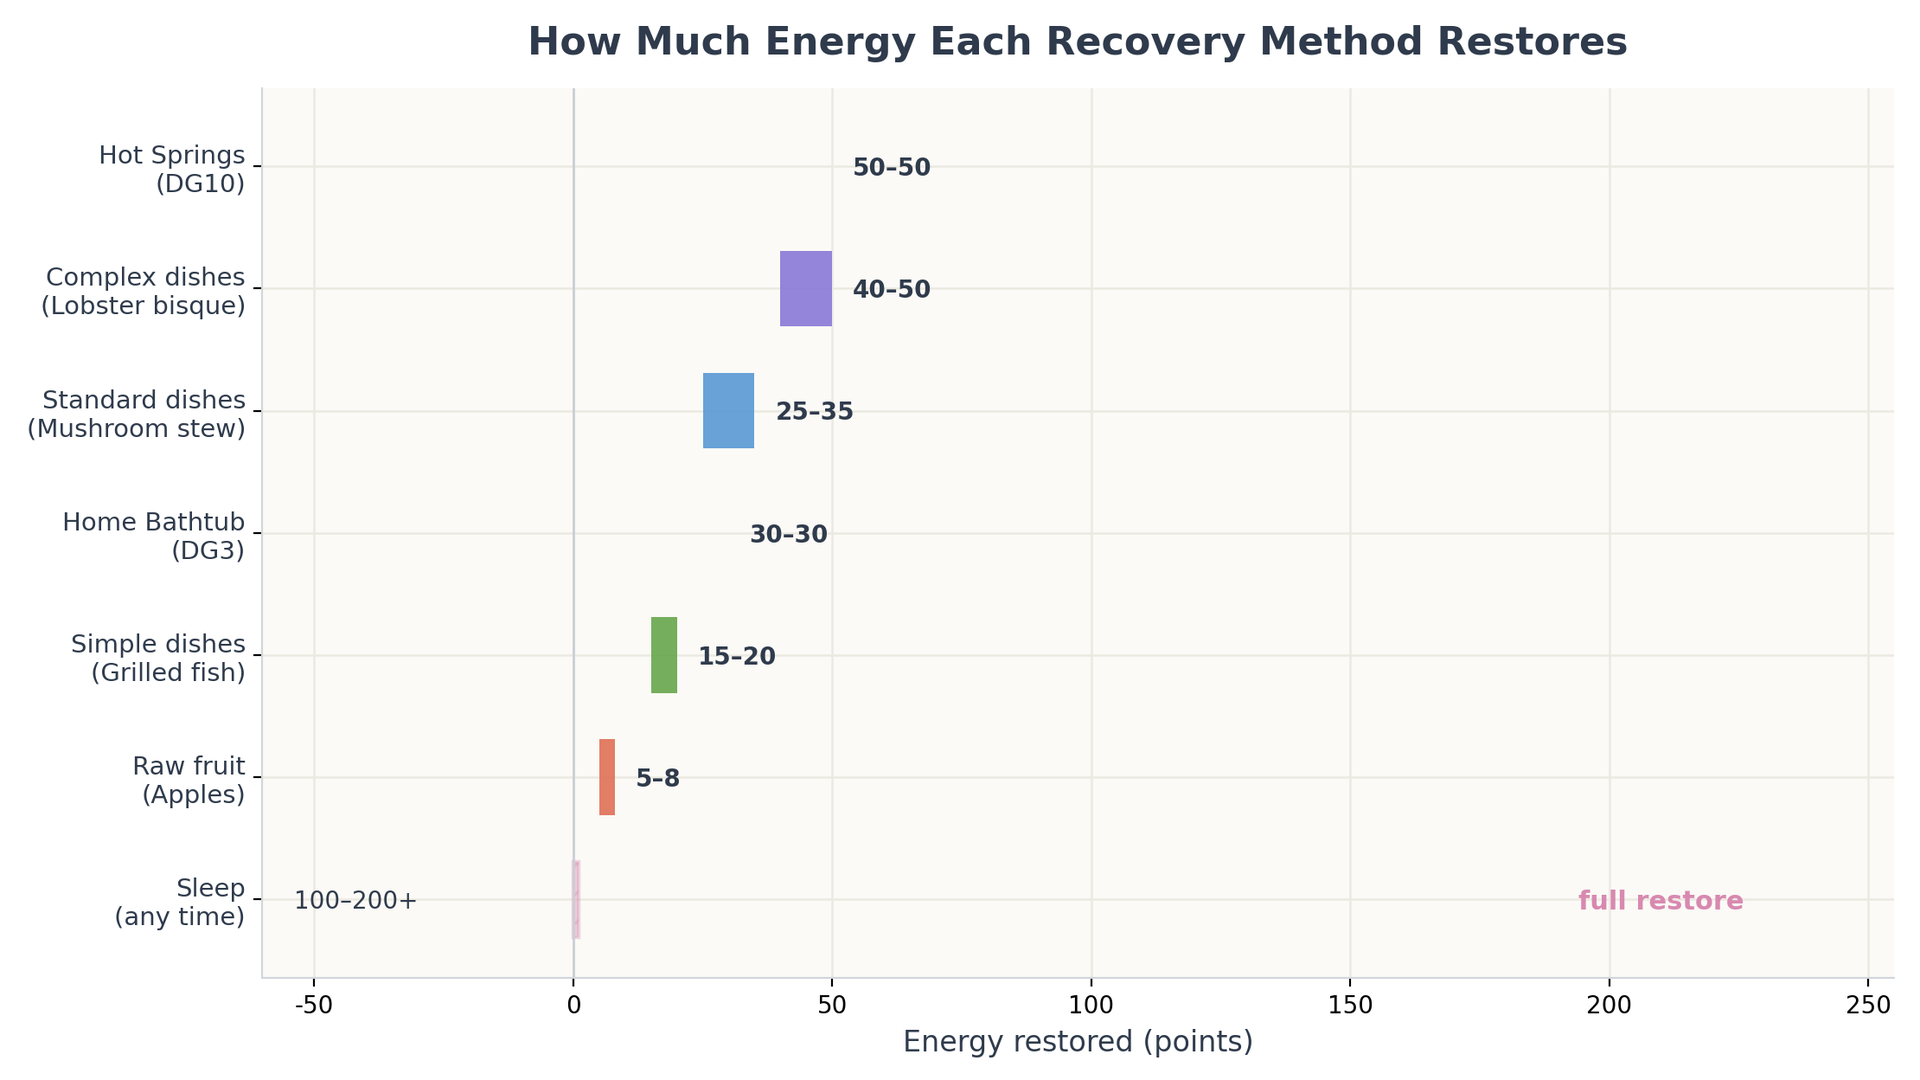
- Eating restores energy instantly and anywhere, from 5-8 for raw fruit up to 40-50 for complex dishes. It does not advance the clock, which makes it the best mid-run recovery. Carrying two or three simple dishes is the cheapest habit, since cooked food is also a sellable good.
- Bathing restores fixed amounts without moving the clock. The home bathtub (craftable from D.G. level 3) returns 30 energy once per day; the Hot Springs (D.G. level 10, on Onsen Mountains) return 50 energy once per day and add a 10% energy-consumption buff for the rest of the day. Using the bath mid-day effectively splits the session into two productive halves.
- Sleeping fully restores energy and is free, but it advances the clock to 6:00 AM and ends the current day. Sleeping early means losing evening fish and bug spawns, so it is only correct after the requests and business of the day are done.
The Optimal Daily Order of Tasks
The fastest routine puts energy-expensive but mandatory tasks first, then banks the easy, cheap tasks at the end. This order works from the first day onward.
- Open the mailbox and claim the Daily Gift. It is a free item every 24 hours and takes five seconds.
- Read the Resident Request board and finish all five requests. These are the only source of Contribution Medals, so they always come before discretionary gathering. If a request needs mining or chopping, do it now while energy is full.
- Water the garden and check crossbreeding results. Watering costs only 1 energy, so it slots easily into the low-energy moments.
- Visit the rotating shop in Central Town. Limited-stock items sell out, so checking early avoids missing a needed material or blueprint.
- Run a gathering route that batches nearby tasks. Chop all needed wood in one trip, mine all needed ore in one trip, and travel between zones only once.
- Bathe mid-day if a second half is worth it. A bathtub refill or a Hot Springs trip stretches the usable pool instead of ending the day.
- Fish or gather for profit after energy recovers. Evening and rainy fishing yield higher-value catches, so saving some energy for later pays better.
- Feed and interact with pets. Cat and dog bond levels decay without daily care, and the actions cost no tool energy.
- Cook and sell high-value dishes, then spend leftover energy on foraging. Cooking and selling are free actions; foraging turns spare points into income.
- Sleep after the daily tasks close. Sleeping with an empty bar is the correct end point, since leftover energy never carries over.
Turn the Routine Into Money and D.G. Progress
The daily board is both the medal engine and a steady Shell income. Some requests award 200 to 500 Shells on top of the medals, so finishing all five is the single best use of a session. Before cooking unlocks at D.G. level 5, fishing is the strongest income; after that, cooking multiplies raw ingredients by three to five times their sell price, which the money guide ranks as the top gold method. A player who always clears the board, waters the garden, and cooks a few dishes compounds both D.G. levels and money with no wasted energy. New players unsure of the basics should start with the complete beginner walkthrough first.
On rainy days, rain auto-waters crops, so a player should spend the saved energy on high-cost actions such as mining or chopping instead of standing idle. Rain effectively refunds the watering budget for the day.
Daily Reset and Seasonal Timing
Requests and the daily gift reset on a 24-hour cycle, so a routine should stay anchored to the same real-time window each day. Time-sensitive spawns — evening fish, night insects, and event windows — only appear late in the in-game day, which is why sleeping immediately after finishing requests is wasteful. Seasonal fish, bugs, and birds rotate with the real calendar, so players trying to complete the museum make time each season for the hobby tied to that season.
Frequently Asked Questions
How many Resident Requests can a player do per day? Five. Each one grants 10 Contribution Medals. Ideally all five are finished every day because medals never roll over.
Does energy regenerate over time? No. It only returns through food, a bath, or sleep. The exception is that sleeping fully restores the current maximum pool.
Is it better to eat food or sleep? For mid-day recovery, eat — food keeps the day alive. For end-of-day recovery, sleep, because it is free and fills the bar with no cost.
Does the Hot Springs buff carry over? No. The 10% energy-reduction buff lasts only until the player sleeps and resets each day.
Can the energy cap go above 200? Currently 200 at D.G. level 15 is the maximum cap.
What happens at zero energy? Tool actions are disabled and the character moves slower; there is no fainting or item loss. Recovering at least 10 energy clears the exhausted state.
Related Heartopia Guides
- Heartopia Energy & Stamina Guide: Recovery & Tips
- Heartopia Money Guide: Fastest Gold & Coin Methods
- Heartopia Beginner Guide: Complete Walkthrough
- Heartopia D.G. Guide: Levels, Rewards & Fast Leveling
- Heartopia Cooking Guide: All Recipes & Best Profit
- Heartopia Crafting Guide: Materials & Blueprints
- Heartopia Fishing Guide: All Fish & Best Money