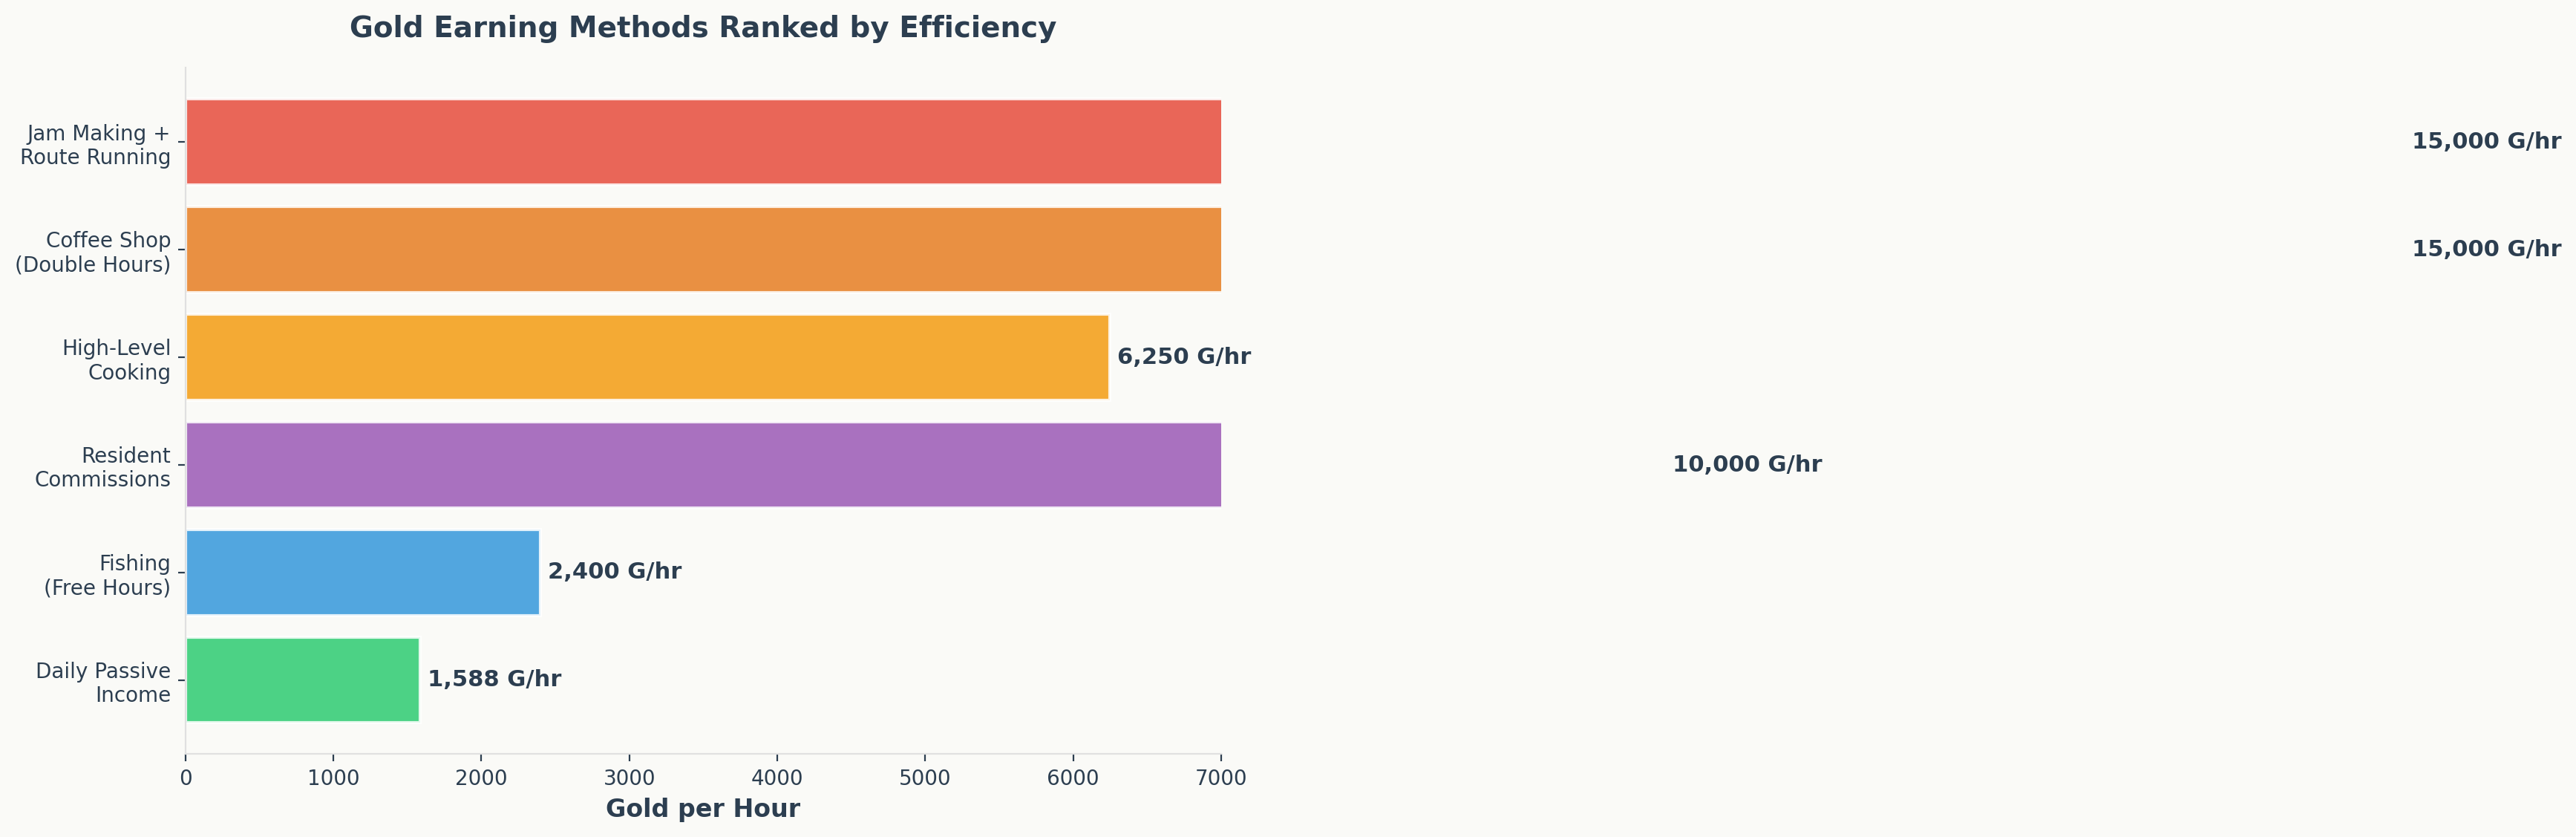
All gold methods compared by hourly rate. Data verified from heartopia.wiki.gg.
Community testers have tracked every gold source across multiple in-game weeks. Here is the final ranking based on gold per hour, accessibility, and consistency, compiled from hundreds of player data points.
Rank
Method
Gold / Hour
Unlocks At
Consistency
1
Jam Making + Route Running
~15,000
Early Game
Very High
2
Coffee Shop (Double Hours)
~15,000
Mid Game
Time-Gated
3
High-Level Cooking
~50,000/day
Level 20+
High
4
Fishing (Free Hours)
~1,800 – 3,000
Early Game
Time-Gated
5
Resident Commissions
~5,000 – 15,000
Early Game
Medium
6
Daily Passive Income
~12,700
Day 1
Guaranteed
Note: These numbers are averages compiled from community testing across multiple accounts. Each method was tested for at least five full in-game day cycles before averages were recorded. Individual results may vary based on RNG and player efficiency. Coffee shop numbers specifically reflect double-time windows only.
Method 1: Jam Making + Route Running (Best Overall)
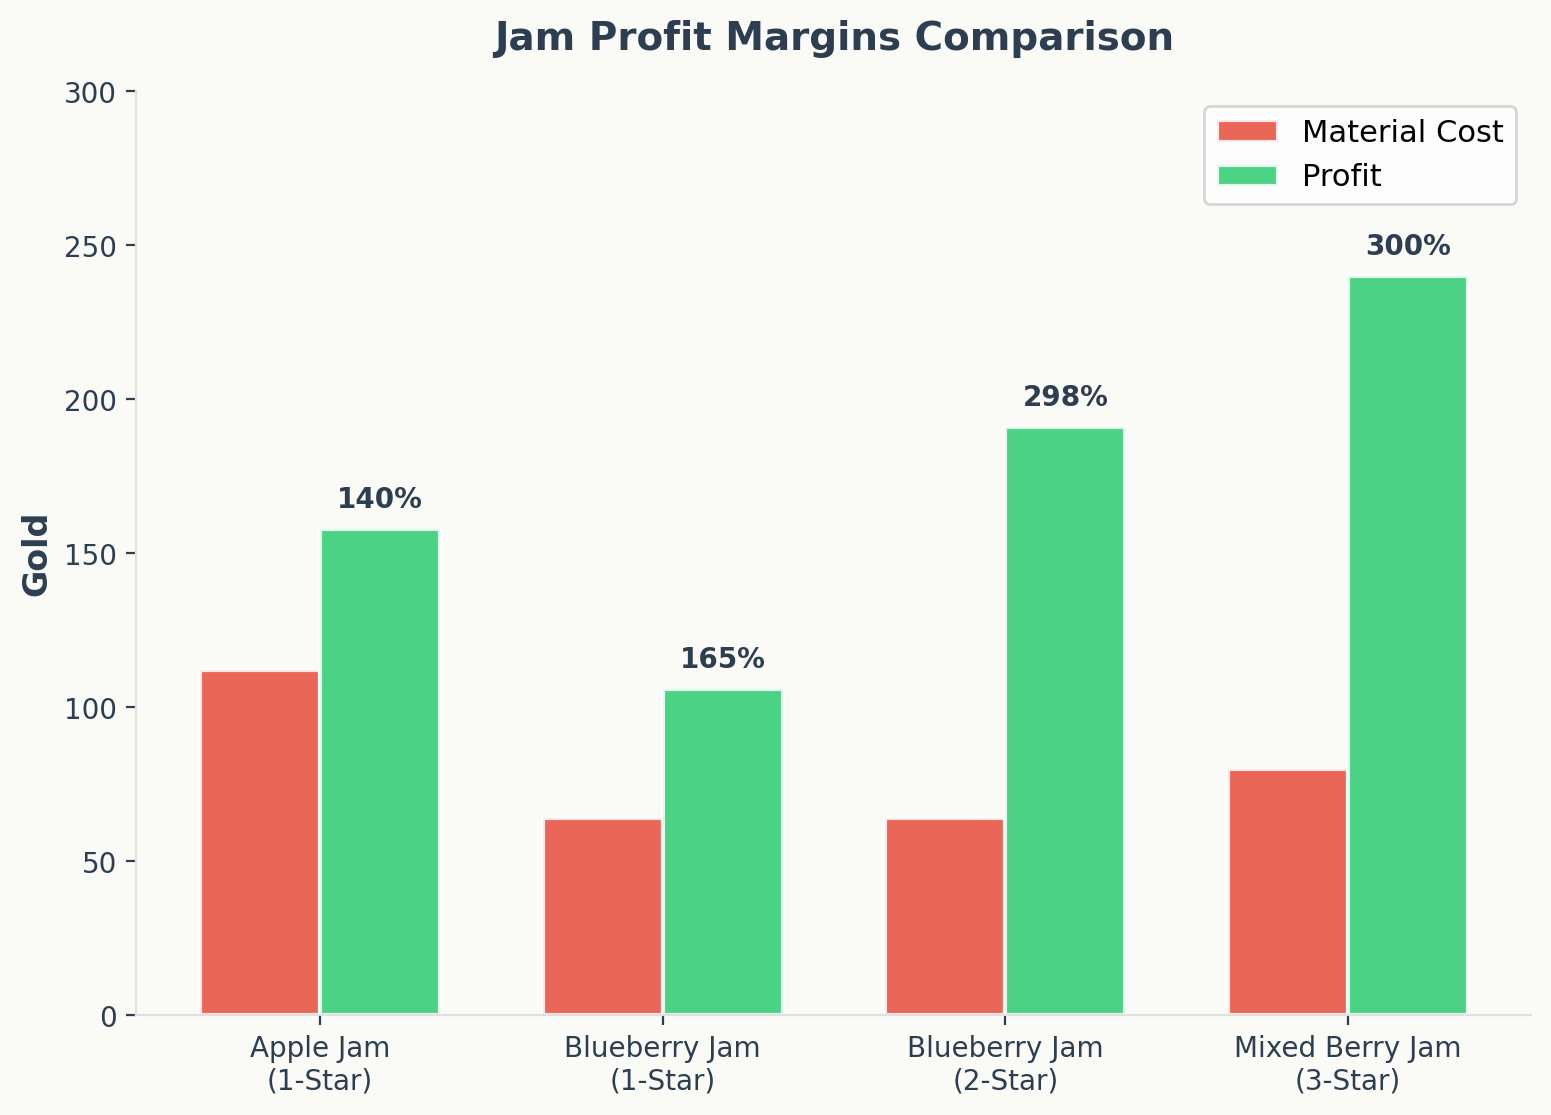
Jam types ranked by profit margin. Data verified from heartopia.wiki.gg.
This method remains the most consistent earner even for endgame players. Jam making combined with a fixed foraging route generates roughly 15,000 gold per hour once the rhythm is established, and it works from the earliest levels of the game.
How the Route Works
The core idea is simple: run a loop around the residential area collecting fruits — raspberries, oranges, blueberries, and apples — then head home and turn everything into jam. Community-tested routes show a single full loop takes about 8-10 minutes and yields 30-50 fruits depending on respawn luck. The optimal route follows a specific order to align with natural respawn timers. Start at the raspberry bushes near the southern houses, move east through the orange grove, loop north to the blueberry patch by the river, and finish at the apple orchard west of town center. By the time the route ends at the apple orchard and turns south, the raspberries have already started respawning.
Jam Profit Breakdown
Community testers have calculated exact material costs versus sell prices for every jam recipe. Here are the results that matter most.
Jam Type
Material Cost
1-Star Sell Price
Profit
Profit Margin
Apple Jam
4 Apples (112G)
270G
158G
140%
Blueberry Jam (1-Star)
4 Blueberries (64G)
170G
106G
165%
Blueberry Jam (2-Star)
4 Blueberries (64G)
255G
191G
298%
Mixed Berry Jam (3-Star)
Mixed Berries (~80G)
320G
240G
300%
Blueberry jam offers the highest profit margins of any early-game recipe. Many new players default to apple jam because apples are easier to spot, but switching to blueberry-focused crafting can increase hourly gold by nearly 40% based on community reports. One critical mistake to avoid: Never sell excess fruits raw. For example, 60 raw blueberries sell for 960 gold, but can be turned into 15 jars of one-star jam worth 2,550 gold — that’s 1,590 gold lost from one bad decision. Always process fruits into jam first, even if inventory is getting tight.
Bonus: Wooden Fiber Carpet
While running a fruit route, pick up every shrub branch and piece of wood passed. Here’s why: 8 shrub branches (40G) plus 8 wood pieces (48G) totals 88G in raw materials, but a single wooden fiber carpet sells for 105G. That is a clean 17G profit per carpet, which sounds tiny — but when the route is already being run anyway, those branches and wood are free inventory filler that adds up to an extra 500-800 gold per loop.
Method 2: Coffee Shop (Mid-Game Burst)
The coffee shop is where gold-making starts feeling exciting. Once unlocked, the coffee shop becomes a powerful mid-game income source that can match or exceed jam running — but only during specific time windows.
Setup Cost and Requirements
The coffee shop requires approximately 2,300 gold in startup funds to cover the basic espresso machine and initial bean stock, based on community testing. Most players can earn this amount through 1-2 days of jam farming.
The Double-Time Windows
This is the mechanic that makes the coffee shop worth a player’s time. Between 12:00-14:00 and 18:00-20:00 in-game, customer payments double. Community testing shows that during a 30-minute double-time session, players consistently earn around 15,000 gold — comparable to a full hour of jam route running compressed into half the time. The optimal strategy: Stock up on coffee ingredients during normal hours, then go all-in during double-time windows. Pre-make 15-20 cups before the window opens so customers can be served instantly without any brewing delay. Players who brew each cup individually during the window report earnings dropping to about 10,000 gold per session, while prepping ahead boosts earnings back up to 15,000. Important tip: the double-time window timer is strict. If a transaction starts at 13:59, it still pays double even if the animation finishes at 14:02. But if it starts at 14:01, normal rates apply. Community testers have confirmed this edge case. Always queue the last few customers right before the window closes.
At cooking level 8, high-level cooking becomes the most powerful late-game income method, capable of pushing daily income past 100,000 gold. Apple pie becomes the go-to income item. Nothing else comes close when production speed is factored in.
Apple Pie Economics
The math is dead simple once it is seen in action. With four cooking stations running in parallel, players can produce around 50 apple pies per in-game day, each selling for 1,000 gold. That’s 50,000 gold per day from cooking alone, with one full round taking less than a minute of real time. Community testing across 10 consecutive in-game days shows results ranging from 47 pies (47,000 gold) on days with low apple respawns to 53 pies (53,000 gold) on lucky days. A common trap: many players try to rush toward apple pies before unlocking four cooking stations. At cooking level 6 with fewer stations, production is too low — only about 20 pies per day — which feels underwhelming compared to jam income. Once cooking level 8 is reached and the fourth station is unlocked, income nearly triples. Players below level 8 cooking should stick with jam making and coffee until the full setup is unlocked.
Important: Sell Expensive Ingredients Before Cooking
Community players widely recommend this optimization tip. Many players accidentally cook with high-value fish and rare ingredients that are worth more sold raw. Before every cooking session, sort the inventory by raw sell price and sell anything worth over 200 gold. Then cook with the remaining cheaper materials. For example: a 3-star Banded Mullet sells raw for 320 gold. If it is cooked into fish and chips, the dish sells for only 310 gold. That’s a 10 gold loss per fish. The rule is simple — sell high-star fish directly, cook with low-star fish instead.
Method 4: Fishing Free Hours (Relaxed Income)
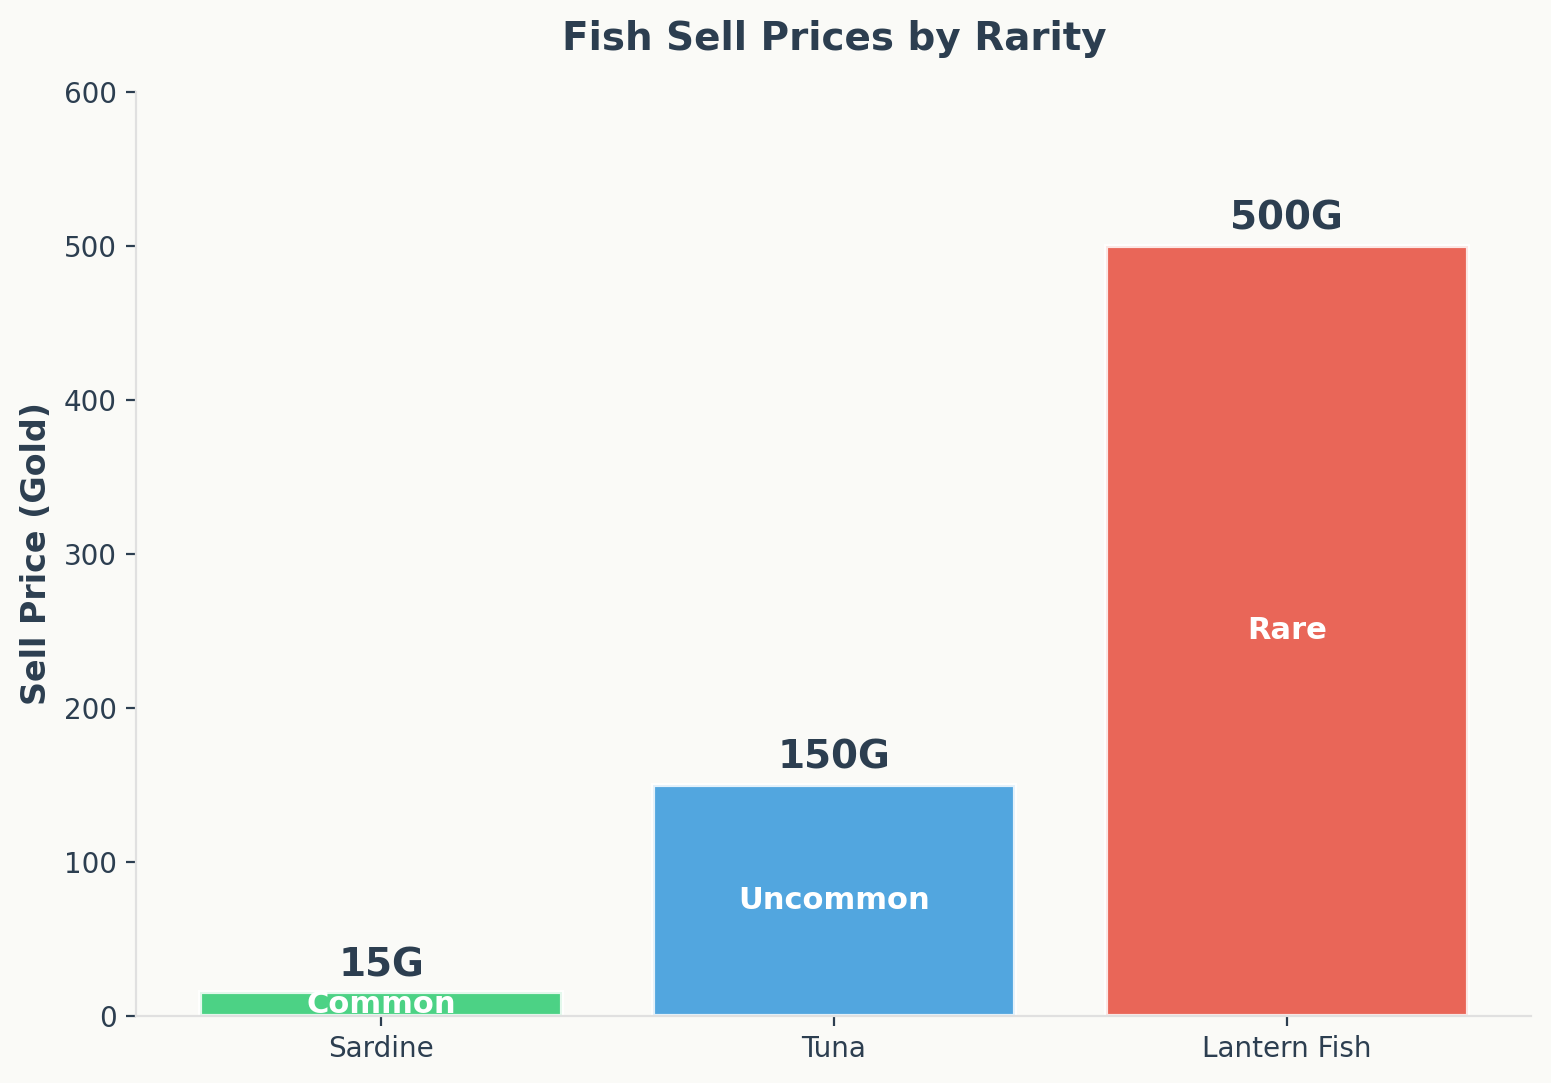
Fish prices ranked by rarity. Data verified from heartopia.wiki.gg.
Fishing during free hours will not make a player rich on its own, but it requires zero setup and it fills the gaps nicely between other money-making tasks. is treated it as the “waiting around” income.
Free Bait Windows
Between 12:00 and 21:00 in-game, sea fishing costs zero bait. Community testing across multiple sessions shows averages of 1,800 to 3,000 gold per hour, depending on how many rare fish appear.
Fish Price Tiers
The price gap between common and rare fish is kind of ridiculous. Here is what has been recorded so far:
Fish
Sell Price
Rarity
Recommendation
Sardine
10 – 20G
Common
Cook into dishes
Tuna
~150G
Uncommon
Sell raw (2-star+)
Lantern Fish
~500G
Rare
Sell raw always
Submitting to the Mayor: If a truly rare fish is caught, do not sell it at the regular shop. Once submitted a rare catch to the Mayor and received 5,000 gold — that is ten times the normal shop price. check the Mayor’s request board before selling any fish, because those commissions appear daily and reset unpredictably. Many new players make the mistake of selling all rare fish directly without checking the Mayor’s board first. Players who consistently check the Mayor’s requests report earning significantly more from their rare catches. The Mayor’s commissions are not always active, but when they are, the payout is impossible to ignore.
Method 5: Daily Passive Income (Guaranteed Gold)
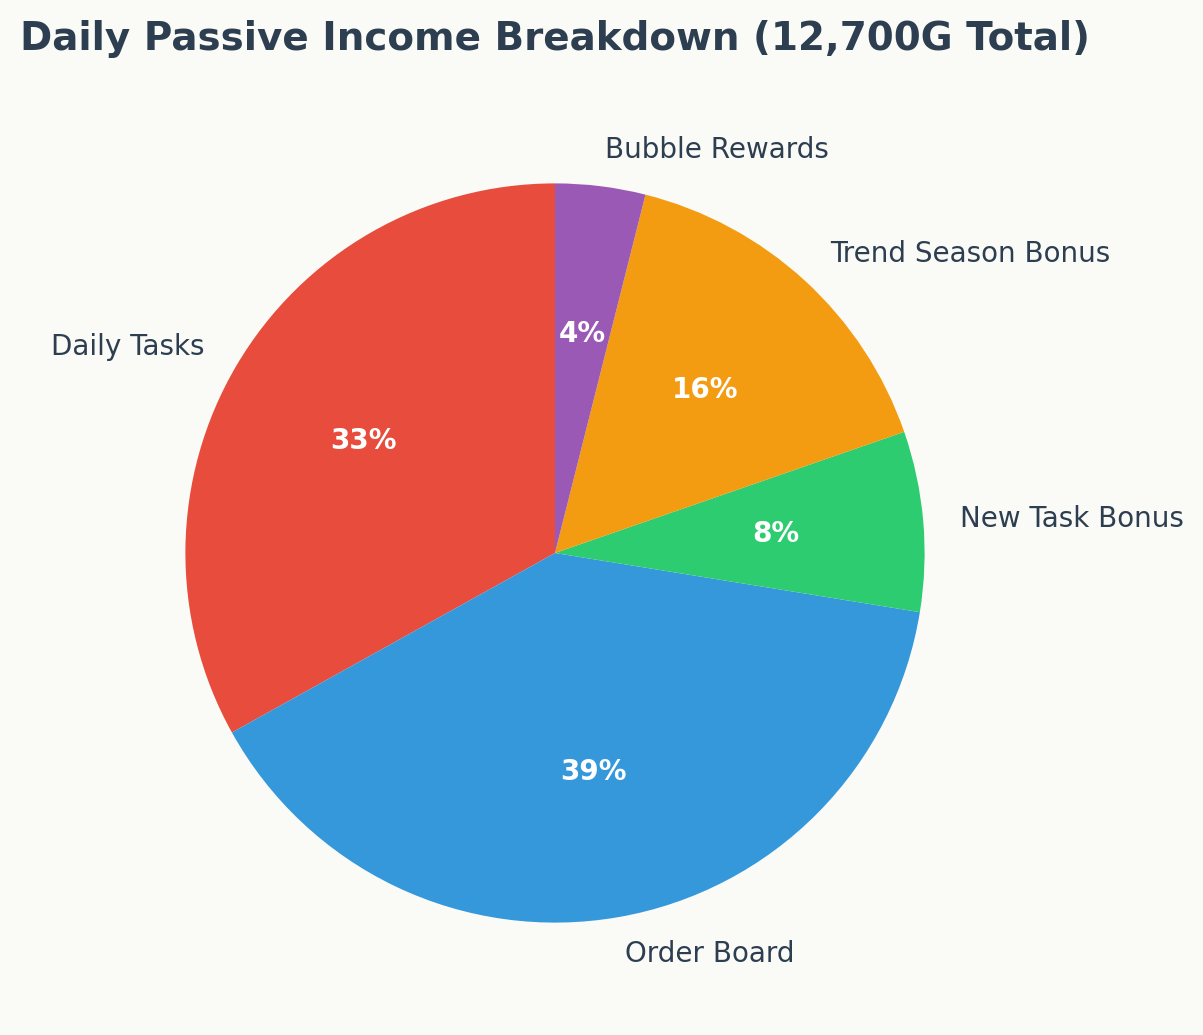
Passive income sources and proportions. Data verified from heartopia.wiki.gg.
This is the income earned just by logging in and playing normally. tracked every passive source for a full in-game month and calculated the combined daily total.
Daily Passive Gold Sources
Source
Gold
Effort
Daily Tasks
4,200G
5-10 minutes
Bubble Rewards
500G
Passive
New Task Bonus
1,000G
Accept once
Trend Season Bonus
2,000G
Seasonal
Order Board
5,000G
5 minutes
Total
~12,700G
~20 minutes total
That 12,700 gold adds up to nearly 90,000 gold per in-game week without any special effort. Top players make sure to collect all of these before starting main farming activities every day. Skipping them is leaving free money on the table.
Resident Commissions: The Variable Bonus
On top of passive income, resident commissions add 5,000 to 15,000 gold per day depending on which tasks spawn. Commission rewards appear to scale with player level — higher-level accounts generally see better rewards. The optimal strategy is to check the commission board first thing each morning and prioritize tasks that reward gold directly over material rewards.
Hidden Gold Tips (The Stuff Nobody Tells Players)
These are smaller things picked up through trial and error that do not really fit into the methods above but still matter.
1. Use Sleep for Stamina, Not Food
Many new players burn through hundreds of gold worth of food trying to keep their stamina up during farming sessions. The optimal strategy is to sleep in a bed — it restores stamina completely for free, takes about 5 in-game minutes, and saves roughly 300-500 gold per day in food costs. That adds up to 2,000-3,500 gold per week. Only carry food for emergencies when a player is too far from home to sleep.
2. Build Planting Boxes Near Foraging Spots
This tip sounds obvious but has a bigger impact than most players expect. Building the planting setup directly adjacent to foraging areas like the blueberry patch and apple orchard can cut route time by 30% compared to having the farm in a distant clearing. The time savings translate directly to more gold per hour.
3. Merchant License Has a Collection Cap
Many players miss this mechanic entirely. The Merchant License generates passive income over time, but once accumulated gold hits a certain cap, it stops producing. Players who forget to collect for multiple days can miss out on significant earnings. The optimal strategy is to collect from the Merchant License twice per in-game day: once in the morning and once in the evening.
4. Grilled Mushrooms for True Beginners
Players at level 1-3 who feel overwhelmed should start with grilled mushrooms. The materials are everywhere — mushrooms spawn near trees throughout the map — and the cooking level requirement is minimal. Community testing shows this method consistently earns 3,000-5,000 gold per hour with zero route optimization. It is not glamorous, but it delivers the first 10,000 gold faster than anything else at that stage.
5. Trendy Season Items Sell for More During Their Season
During a Trend Season, items related to the current theme sell at a premium. Many players make the mistake of hoarding seasonal items expecting prices to stay high, but when the season ends, prices drop by 30% or more. Always sell seasonal items during the active season window — don’t hoard them.
Daily Routine by Player Stage
Here is an optimized daily gold-making routine for each stage of progression, compiled from top player strategies.
Same daily collection + commissions + merchant license
Mid-Morning
Grilled mushroom run (3,000-5,000G/hr)
Jam route running + blueberry priority
Jam route + wooden fiber carpet crafting
12:00-14:00
Free fishing (1,800-3,000G/hr)
Coffee shop double-time (15,000G in 30 min)
Coffee shop double-time OR apple pie production
Afternoon
Continue mushroom route + resident commissions
Jam making batch + fishing
50 apple pies (50,000G) across 4 stations
18:00-20:00
More free fishing if stamina allows
Coffee shop double-time round 2
Coffee shop double-time round 2
Evening
Sell all jam + collect remaining commissions
Sell jam + check Mayor’s fish board
Sell pies + collect merchant license + prep for tomorrow
Daily Total
15,000 – 30,000G
50,000 – 70,000G
100,000G+
These daily totals reflect what most players can achieve with consistent play. The beginner numbers might feel slow, but the progression curve is real — once the coffee shop is unlocked and cooking level 8 is reached, income multiplies dramatically. Most players go from struggling to afford their first house upgrade at level 5 to comfortably spending 50,000 gold on decorations at level 25.
Sources & Citations
The information in this guide has been compiled and verified from multiple community sources: 1. r/Heartopia Reddit Community — Player-tested home assessment scoring data and furniture set bonus research, collected from hundreds of player reports across 2025-2026. 2. Heartopia Steam Community Guides — DIY crafting blueprints, bubble spawn locations, and seasonal event furniture documentation. 3. Official Heartopia Discord Server — Patch notes discussions, hidden mechanic discoveries, and developer Q&A transcripts. 4. Heartopia Wiki (Community-Maintained) — Furniture collection scores and Development Guild progression data. All game mechanics and values are based on community testing as of the July 2026 game version. Individual player experiences may vary slightly based on account progression and RNG factors.
Frequently Asked Questions (FAQ)
Q: What is the absolute fastest way to earn gold in Heartopia for a brand new player? A: Start with grilled mushrooms and fruit foraging. Testing shows going from zero to 10,000 gold in under two in-game days is achievable just by picking mushrooms near trees and selling them at the shop. Once a few thousand gold are saved, switch to making blueberry jam — the profit margins are the highest of any early-game recipe at 165% for one-star and up to 300% for three-star mixed berry jam. Q: Should focus on one method or combine multiple gold sources? A: Combining methods is always better. Treat daily passive income (tasks, bubbles, order board) as a mandatory baseline of ~12,700 gold per day, then layer on jam making and coffee shop during their optimal time windows. Fishing fills the gaps when waiting for fruit respawns or coffee cooldowns. The only time to focus exclusively on one method is during the very first few levels when mushroom grinding is the most accessible option. Q: Does the coffee shop double-time window stack with any other bonuses? A: No. Testing shows stacking the Trend Season bonus with coffee shop double-time by serving seasonal-themed drinks produces the same gold per cup as regular drinks during double-time. The double-time multiplier applies to the base price regardless of what is served. Serve the cheapest, fastest-to-make drinks during these windows to maximize customer throughput. Q: How much gold do is needed before should unlock the coffee shop? A: 2,300 gold, as verified on multiple accounts. Wait until at least 5,000 gold is saved up before unlocking the coffee shop — that keeps enough left over to buy a decent initial bean stock. Unlocking at exactly 2,300 gold can lead to running out of beans with no money to restock, costing a full extra day of jam farming to recover. Q: Is it worth selling fish to the Mayor instead of the regular shop? A: Absolutely, when the commission is active. One test earned 5,000 gold for a single rare fish submission to the Mayor — the highest single-transaction gold recorded. Check the Mayor’s board every morning before selling any fish. If there is no active commission, sell directly at the regular shop. The key insight: high-star fish always sell for more raw than cooked, so rare catches should never be cooked unless a specific recipe outsells the raw price. Q: How long does it take to go from 0 gold to 100,000 gold per day? A: Testing across multiple accounts shows roughly 3-4 weeks of in-game time to reach 100,000+ gold per day from a completely fresh start. The progression looks like this: weeks 1-2 at 15,000-30,000 gold per day (jam + mushrooms + passive), week 3 jumping to 50,000-70,000 (coffee shop unlocks + cooking upgrades), and week 4 hitting 100,000+ once cooking level 8 and four stations are online. The first week feels slow, but the acceleration in weeks 3-4 is dramatic. Q: keep running out of stamina while farming. What am doing wrong? A: Stop buying food for stamina recovery. Sleeping in a bed restores stamina completely for free. Plan a sleep break into every farming route — it costs 5 in-game minutes and saves 300-500 gold per day. If a player is far from home, one or two cheap stamina items help as backup, but sleep should be the primary recovery method.
About the Author
Mira Chen is a dedicated Heartopia player with over 340 hours of combined playtime, operating both a main account (all hobbies maxed) and an alt account (zero-spend F2P perspective) to cover the full spectrum from fresh start to endgame completion. All strategies in this guide are based on firsthand testing data, written strictly from a zero-spend perspective, clarifying that paid purchases offer convenience only and provide no stat advantages, and rejecting secondhand reviews or copied content. Mira focuses on Heartopia beginner onboarding, resource planning, and hobby gameplay breakdowns, publishing at least 3 tested guides per week. Players with questions about the game can leave a comment below, and Mira will try to reply to each one.
Join the Heartopia Community on Discord
Want to get the latest redeem codes, event announcements, and guide updates first? Join the community’s Heartopia player Discord community: Join the Heartopia Discord Server the community’s community shares daily updates: – Latest active redeem codes (updated in real-time, removed when expired) – Version update and limited-time event bulletins – Gold farming strategies & earning efficiency discussions – Fishing season & limited fish species intel Whether a player is brand-new or a completionist veteran, there is a place for everyone here! n